|
Google が設計した Coral USB Accelerator は Edge TPU coprocessor を埋め込んだ、USB接続の端末チップです。on-board Edge TPU coprocessor は1秒あたり4兆回(TOPS)の演算を可能にするICチップです。また、2テラ回の演算で1ワットという省エネ効率(2 TOPS per watt)を持ちます。例えば、 MobileNet v2 のような mobile vision モデルを用いた時、効率的な方法で約400 FPSの演算を実現します。
したがって、PCやコンピュータ・ボードにCoral USB Accelerator をUSB接続すれば、当該本体に Edge TPU の演算機能を追加できます。Linux、Mac OS 、 Windows ベースのコンピュータに接続して、deep learning モデルを用いた高速な機械学習を可能とします。たとえば、MobileNet v2などの最先端のCNNモデル(400fps)を電力効率の高い方法で実行できます。また、モデルを一から構築する必要もなく、TensorFlow Liteモデルをコンパイルして、Edge TPUで実行できます。
このページでは、Coral USB Accelerator をRaspberry Pi に接続して画像識別や物体検出などの機械学習をするために必要な手順の初歩的な説明をします。Raspberry Pi への OS のインストール及びリモートPCからの操作に関する説明は、Raspberry Pi 入門のページを参照ください。ここでは、これらの環境は準備されていると想定します。
Last updated: 2021.2.1
Coral USB accelerator 環境 のセットアップ |
ハードウエアの必要環境としては、以下のOSを持つコンピュータが必要です。
Python のバージョンは、3.5 - 3.8のいずれかがインストールされていることが必要です。
ここでは、Raspberry Pi 3 Model B+ に Coral USB を接続するケースを説明します。OS は Debian 10 (Buster) です。Python のバージョンは Python 3.7.3 です。
USB接続には、USB 3.0 Type-C が採用されていますが、USB 2.0 で接続するためのコネクターが付属しています。ここでは、USB 2.0 で接続します。
初めに、Raspberry Pi OS のバージョンと python のバージョンを調べます。Raspberry Pi にリモート端末からssh 接続またはvnc 接続をして、Raspberry Pi の terminal コンソールで以下のコマンドを入力します。
$ cat /proc/device-tree/model
Raspberry Pi 3 Model B Plus Rev 1.2

$ cat /etc/debian_version
10.7

$ python3 --version
Python 3.7.3
Python 3.7.3 がインストールされています。python の環境を構築するために、pip3をインストールします。
$ sudo apt-get update

$ sudo apt-get install python3-pip python3-dev
Coral USB の環境モジュールのインストールの手順は、coral.ai の site に説明されています。この説明に沿ってインストール作業を進めます。
まず始めに、Debian package repository のインストールを行います。
echo "deb https://packages.cloud.google.com/apt coral-edgetpu-stable main" | sudo tee /etc/apt/sources.list.d/coral-edgetpu.list

curl https://packages.cloud.google.com/apt/doc/apt-key.gpg | sudo apt-key add -

sudo apt-get update
Edge TPU runtimeのインストールを行います。
sudo apt-get install libedgetpu1-std
ここで、USB Accelerator を Raspberry Pi に接続します。すでに接続していたのならば、再度接続し直す。ここで、PyCoral library をインストールします。
Pycoral は TensorFlow Lite library の上に作成された Python ライブラリ で、Edge TPU の機能を引き出すためのソフトです。Coral USB Accelerator を初めて使用するときは、この PyCoral API を活用する方がベターでしょう。
PyCoral library をインストールするために、以下のコマンドを入力します。
sudo apt-get install python3-pycoral
MobileNet v2 と example code を用いて、 image classification を実行するために、以下の手順を踏みます。
まず、GitHub から example code をダウンロードします。
mkdir coral && cd coral

git clone https://github.com/google-coral/pycoral.git

cd pycoral
次に、モデル、ラベル、画像をダウンロードします。
bash examples/install_requirements.sh classify_image.py
以下のスクリプトを実行して、正常に作動するかをみましょう。
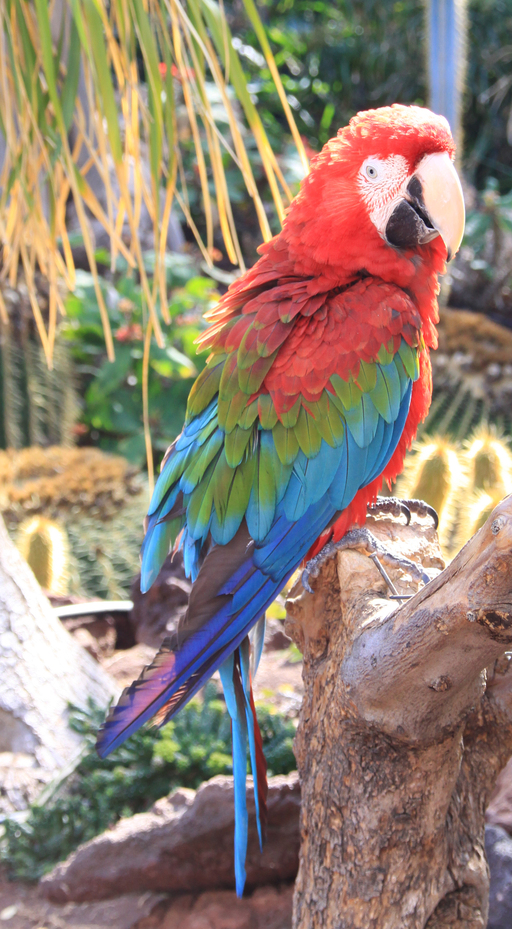
python3 examples/classify_image.py \
--model test_data/mobilenet_v2_1.0_224_inat_bird_quant_edgetpu.tflite \
--labels test_data/inat_bird_labels.txt \
--input test_data/parrot.jpg
結果は
----INFERENCE TIME----
Note: The first inference on Edge TPU is slow because it includes loading the model into Edge TPU memory.
117.4ms
11.4ms
11.3ms
11.2ms
11.4ms
-------RESULTS--------
Ara macao (Scarlet Macaw): 0.75781
となるはずです。もしエラーが出たら、OS もしくは、環境ライブラリのインストールが正常ではない可能性があります。
ちなみに、以下のコマンドを入力して、
python3 -c "from ctypes.util import find_library; print(find_library(\"edgetpu\"))"
結果が、「libedgetpu.so.1」となれば、正常です。そうでなければ、Edge TPU runtimeのインストールがうまくいっていないことになります。
Edge TPU の USB が有効になっているかどうかを調べるためには、以下のコマンドを打ちます。
lsusb -d 1a6e:089a
正常な結果は 1a6e:089a Global Unichip Corp です。もしそうでなければ、デバイスは有効になっていません。
Edge TPU を用いた画像識別 |
もう一つのexample code を活用した画像識別を実行してみましょう。以下のコマンドを入力して下さい。
mkdir coral && cd coral

git clone https://github.com/google-coral/tflite.git

cd tflite/python/examples/classification

bash install_requirements.sh

python3 classify_image.py \
--model models/mobilenet_v2_1.0_224_inat_bird_quant_edgetpu.tflite \
--labels models/inat_bird_labels.txt \
--input images/parrot.jpg
結果は以下の通りです。
----INFERENCE TIME----
Note: The first inference on Edge TPU is slow because it includes loading the model into Edge TPU memory.
119.6ms
11.3ms
11.6ms
11.4ms
11.8ms
-------RESULTS--------
Ara macao (Scarlet Macaw): 0.77734
識別された鳥は Scarlet Macaw で、正答率は77.73%です。上記の例とは正答率が若干異なります。画像識別に使用された画像は以下の通りです。
Edge TPU を用いた物体検出 |
PyCoral ライブラリのすべての examples を利用するために、
bash examples/install_requirements.sh
と打ちます。bash コマンドの後に classify_image.py などのファイル名を明記しません。
PyCoral ライブラリの中のexamples ディレクトリの内容を見てみましょう。
pi@raspberrypi:~/coral/pycoral/examples $ tree
.
├── README.md
├── backprop_last_layer.py
├── classify_image.py
├── detect_image.py
├── imprinting_learning.py
├── install_requirements.sh
├── model_pipelining_classify_image.py
├── semantic_segmentation.py
├── small_object_detection.py
└── two_models_inference.py
10個のPythonファイルが存在します。
coral.ai/examples/に掲載されている例が配置されています。ちなみに、PyCoral API の test_data の中は以下のようになっています。pi@raspberrypi:~/coral/pycoral/test_data $ tree . ├── bird.bmp ├── cat.bmp ├── coco_labels.txt ├── deeplabv3_mnv2_pascal_quant_edgetpu.tflite ├── grace_hopper.bmp ├── imagenet_labels.txt ├── inat_bird_labels.txt ├── kite_and_cold.jpg ├── mobilenet_v1_1.0_224_l2norm_quant_edgetpu.tflite ├── mobilenet_v1_1.0_224_quant_embedding_extractor_edgetpu.tflite ├── mobilenet_v2_1.0_224_inat_bird_quant.tflite ├── mobilenet_v2_1.0_224_inat_bird_quant_edgetpu.tflite ├── mobilenet_v2_1.0_224_quant_edgetpu.tflite ├── parrot.jpg ├── pipeline │ ├── inception_v3_299_quant_segment_0_of_2_edgetpu.tflite │ └── inception_v3_299_quant_segment_1_of_2_edgetpu.tflite ├── ssd_mobilenet_v2_coco_quant_no_nms_edgetpu.tflite ├── ssd_mobilenet_v2_coco_quant_postprocess_edgetpu.tflite ├── ssd_mobilenet_v2_face_quant_postprocess_edgetpu.tflite └── sunflower.bmp 1 directory, 20 files
example code を活用した物体検出を実行してみましょう。
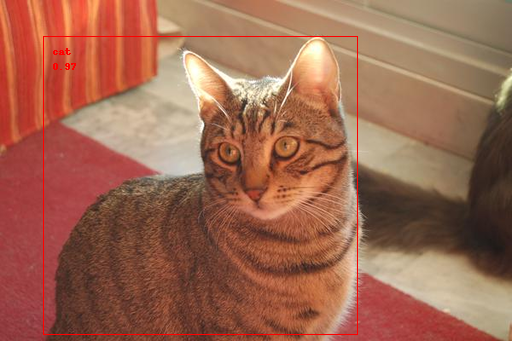
python3 examples/detect_image.py \
  --model test_data/ssd_mobilenet_v2_coco_quant_postprocess_edgetpu.tflite \
  --labels test_data/coco_labels.txt \
  --input test_data/cat.bmp \
  --output ./cat_processed.bmp
以下の結果が表示されます。
----INFERENCE TIME----
Note: The first inference is slow because it includes loading the model into Edge TPU memory.
229.39 ms
65.66 ms
74.43 ms
78.45 ms
79.04 ms
-------RESULTS--------
cat
  id:     16
  score:  0.97265625
  bbox:   BBox(xmin=43, ymin=36, xmax=357, ymax=334)
coco class no.16 は猫です。正答率は 97% です。bbox の位置も表示されています。以下が処理された画像です。
もう少し複雑な画像の物体検出をしてみましょう。~/test_data/ディレクトリに物体検出で頻繁に使用される dog.jpg をコピーして、以下のコマンドを打ちます。
python3 examples/detect_image.py   \
  --model test_data/ssd_mobilenet_v2_coco_quant_postprocess_edgetpu.tflite \
  --labels test_data/coco_labels.txt \
  --input test_data/dog.jpg \
  --output ./dog_processed.jpg
結果は以下の通りです。
----INFERENCE TIME----
Note: The first inference is slow because it includes loading the model into Edge TPU memory.
231.24 ms
56.98 ms
61.79 ms
65.08 ms
59.25 ms
-------RESULTS--------
dog
  id:     17
  score:  0.95703125
  bbox:   BBox(xmin=117, ymin=219, xmax=307, ymax=541)
bicycle
  id:     1
  score:  0.87109375
  bbox:   BBox(xmin=133, ymin=126, xmax=570, ymax=453)
car
  id:     2
  score:  0.72265625
  bbox:   BBox(xmin=471, ymin=73, xmax=696, ymax=167)
一匹の犬、1台の自転車、1台の自動車が検出されています。Pytorch で SSD モデルを使用した時と比較すると、若干精度が落ちます。Pytorch での物体検出例を見て下さい。また、Yolo 2 モデルでは、自動車ではなくトラックとして検出されます。
さらに複雑な例を見ましょう。
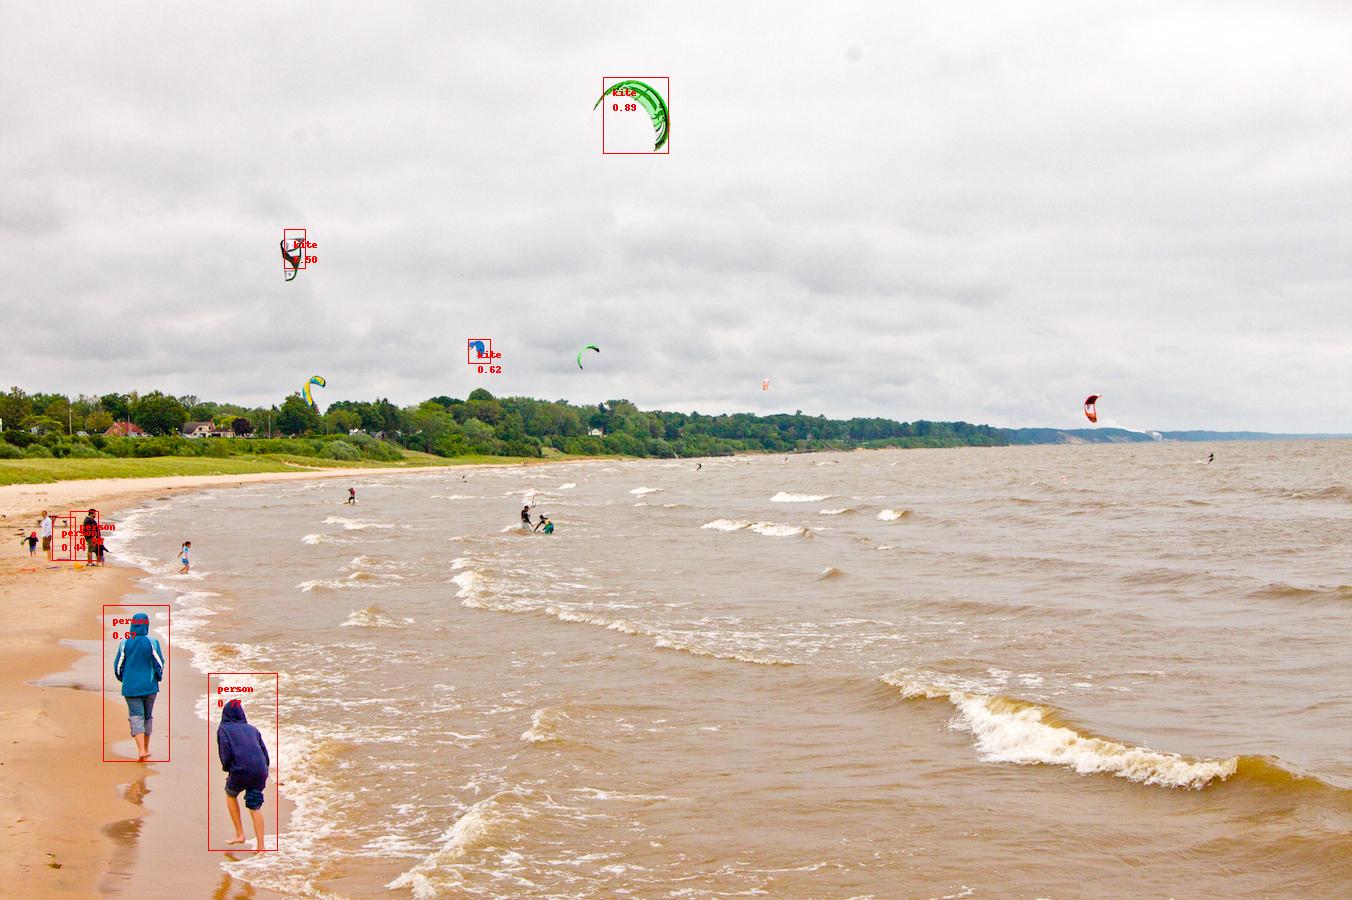
python3 examples/detect_image.py \
  --model test_data/ssd_mobilenet_v2_coco_quant_postprocess_edgetpu.tflite \
  --labels test_data/coco_labels.txt \
  --input test_data/kite_and_cold.jpg \
  --output ./kite_processed.jpg
以下の結果が表示されます。物体検出でよく使用される画像(海岸で遊ぶ人々とウインドサーフィン)です。
-------RESULTS--------
kite
  id:     37
  score:  0.89453125
  bbox:   BBox(xmin=603, ymin=77, xmax=668, ymax=153)
person
  id:     0
  score:  0.765625
  bbox:   BBox(xmin=208, ymin=673, xmax=277, ymax=850)
person
  id:     0
  score:  0.671875
  bbox:   BBox(xmin=103, ymin=605, xmax=169, ymax=761)
kite
  id:     37
  score:  0.6171875
  bbox:   BBox(xmin=468, ymin=339, xmax=490, ymax=363)
person
  id:     0
  score:  0.55859375
  bbox:   BBox(xmin=70, ymin=511, xmax=98, ymax=560)
kite
  id:     37
  score:  0.5
  bbox:   BBox(xmin=284, ymin=229, xmax=305, ymax=268)
person
  id:     0
  score:  0.44140625
  bbox:   BBox(xmin=52, ymin=517, xmax=75, ymax=560)
4名の人物と3個のタコ(kite)が検出されていますが、これを越える数の人物とタコの画像が写っています。検出精度は高くありません。Tensorflow 2.0 で ssd_mobilenet_v1_coco_2017_11_17 を用いた時と比較すると明白に劣ります。TensorFlow 2.0 を用いた物体検出のページを参照して下さい。
Edge TPU を用いたライブカメラからの物体検出 |
TensorFlow Lite (tflite_runtime)を以下の公式ページのTensorFlow Lite for Pythonを参考にして、インストールします。RasPi のターミナルで
pip3 install https://github.com/google-coral/pycoral/releases/download/release-frogfish/tflite_runtime-2.5.0-cp37-cp37m-linux_armv7l.whl
と打ちます。
ライブビデオからの映像を処理するためのソフトを Google-Coral の Git repo からダウンロードします。
mkdir google-coral && cd google-coral
git clone https://github.com/google-coral/examples-camera.git --depth 1
ホルダーの構成は以下の通りです。
.
├── gstreamer
├── nativeapp
├── opencv
├── pygame
├── raspicam
├── download_models.sh
├── READE.md
...
次に、モデルをダウンロードします。
cd examples-camera
sh download_models.sh
すべてのラベルとモデルがダウンロードされ、新しいホルダー all_models に配置されます。ちなみに、all_models の内容は以下の通りです。拡張子 .tflite を持つモデルは、Tensorflow モデルから edge TPU で実行可能にするTensorflow Lite モデルに変換されたものです。
pi@raspberrypi:~/coral/google-coral/examples-camera/all_models $ tree
.
├── coco_labels.txt
├── imagenet_labels.txt
├── inat_bird_labels.txt
├── inat_insect_labels.txt
├── inat_plant_labels.txt
├── inception_v1_224_quant.tflite
├── inception_v1_224_quant_edgetpu.tflite
├── inception_v2_224_quant.tflite
├── inception_v2_224_quant_edgetpu.tflite
├── inception_v3_299_quant.tflite
├── inception_v3_299_quant_edgetpu.tflite
├── inception_v4_299_quant.tflite
├── inception_v4_299_quant_edgetpu.tflite
├── mobilenet_ssd_v1_coco_quant_postprocess.tflite
├── mobilenet_ssd_v1_coco_quant_postprocess_edgetpu.tflite
├── mobilenet_ssd_v2_coco_quant_postprocess.tflite
├── mobilenet_ssd_v2_coco_quant_postprocess_edgetpu.tflite
├── mobilenet_ssd_v2_face_quant_postprocess.tflite
├── mobilenet_ssd_v2_face_quant_postprocess_edgetpu.tflite
├── mobilenet_v1_1.0_224_quant.tflite
├── mobilenet_v1_1.0_224_quant_edgetpu.tflite
├── mobilenet_v1_1.0_224_quant_embedding_extractor.tflite
├── mobilenet_v1_1.0_224_quant_embedding_extractor_edgetpu.tflite
├── mobilenet_v2_1.0_224_inat_bird_quant.tflite
├── mobilenet_v2_1.0_224_inat_bird_quant_edgetpu.tflite
├── mobilenet_v2_1.0_224_inat_insect_quant.tflite
├── mobilenet_v2_1.0_224_inat_insect_quant_edgetpu.tflite
├── mobilenet_v2_1.0_224_inat_plant_quant.tflite
├── mobilenet_v2_1.0_224_inat_plant_quant_edgetpu.tflite
├── mobilenet_v2_1.0_224_quant.tflite
├── mobilenet_v2_1.0_224_quant_edgetpu.tflite
└── pet_labels.txt

0 directories, 32 files
all_models に利用可能なラベルとモデルが表示されています。これらを用いて、opencv にある detect.py を実行します。その前に必要な opencv ライブラリを整備します。opencv のディレクトリに行って、
cd opencv
bash install_requirements.sh
と入力します。この時エラーが出たら、改めて opencv環境を、以下のようにインストールします。
pip3 install opencv-contrib-python; sudo apt-get install -y libatlas-base-dev libhdf5-dev libhdf5-serial-dev libjasper-dev libqtgui4 libqt4-test
webcamera をRasPi に接続して、
cd ~/coral/google-coral/examples-camera/opencv

python3 detect.py \
  --model ../all_models/mobilenet_ssd_v2_coco_quant_postprocess_edgetpu.tflite \
  --labels ../all_models/coco_labels.txt
と入力すると、webcamera のライブ映像から物体検出が実行されます。物体特定の精度は良くありませんが、相当に早いスピードで実行されます。
次日、GStreamer を利用するケースを取り上げます。以下のように関連ライブラリをインストールします。
cd google-coral/examples-camera/gstreamer

bash install_requirements.sh
単に以下のコマンドを入力するだけで、ライブ映像から物体検出しました。
cd ~/coral/google-coral/examples-camera/gstreamer

python3 detect.py
ラベルとモデルを特定するときは
cd ~/coral/google-coral/examples-camera/gstreamer

python3 detect.py \
  --model ../all_models/mobilenet_ssd_v2_coco_quant_postprocess_edgetpu.tflite \
  --labels ../all_models/coco_labels.txt
のように入力します。opencv を用いたケースと同じように、ライブ映像からの物体検出がなされます。
**** 続く ****