|
2019年10月1日、GoogleのTensorFlow開発チームはオープンソースの機械学習ライブラリ TensorFlow 2.0 を発表しました。JavaScript 向けの TensorFlo.js、モバイルやIoT向けの TensorFlow Lite、大規模な実装向けの TensorFlow Extended などを提供し、機械学習向けの包括的なプラットフォームを目指しています。低レベルのAPIも強化し、研究者向けの機能強化も加わった。モバイル デバイスや組み込みデバイスにモデルをデプロイするための軽量なライブラリとして、TensorFlow Lite が利用できます。JavaScript を使用して ML モデルを開発するためのライブラリとして、TensorFlow.jsが開発されています。
こうして、TensorFlow が大幅に改訂されて、version 1.x からversion 2.xに変更されました。Keras がTensorFLowのモジュールに統合されました。そして、それに対応しての関係でしょうが、TensorFlow 1.xで使用されていたいくつかの重要なモジュールが廃止されました。とりわけ、TensorFlow 2 で、tf.contribが廃止された影響は大きいです。この結果、TensorFlow 1.xで作成された機械学習プログラムの多くが TensorFlow 2 ではエラーが出て、正常に作動しません。また、Keras がTensorFLowのモジュールに統合されましたので、従来のKeras単体でのコードが正常に動作しません。
このページでは、TensorFlow 2 のもとで正常に作動するDeep Learning(CNN)のPython実装の例、及び、Yolo(You Only Look Once) と呼ばれるPython API を説明します。特に、一般物体検出アルゴリズムをPythonでコード化したライブラリの代表的な事例を取り上げて、機械学習プログラムの実装と実行について説明します。TensorFlow LiteおよびTensorFlow.jsの活用についての説明は別のページで行う予定です。
python関連のパッケージなどの環境はセットアップされているとします。Jupyter Notebookなどが必須なので、Jupytrer Notebook はインストールされていることを前提にします。Jupyter Notebook がまだインストールされていない場合には、Jupyter Notebook のページを読むことをお勧めします。このページでは、主に MacOS で実証していますが、MacOSでもUbuntuのどちらでも正常に動作することは確認しています。TensorFlow 2 がインストールされていれば、Windowsでも正常に作動すると思います。以下の説明で使用した Python のバージョンは Python 3.9 です。Tensorflow2 はPython 3.9 をサポートしています。
このページでは、GPUを搭載していないPCを前提にしているので、リアルタイムでの物体検出では、処理速度が遅く、画像の切り替わりがスムーズでないことはやむを得ません。また、動作確認は以下に明記されたTensorflowやKerasなどのバージョンで行っています。ソフトウエ環境は
numpyのバージョンは1.20.3です
scipyのバージョンは1.6.3です
matplotlibのバージョンは3.4.2です
PIL(Pillow)のバージョンは8.2.0です
kerasのバージョンは2.8.0です
tensorflowのバージョンは2.8.0です
pandasのバージョンは1.2.4です
sklearnのバージョンは0.24.2です
Googleが提供するGoogle Colaboratoryは、Jupyter Notebook をベースとした、Googleの仮想マシン上で動くPython実行環境です。Googleアカウントを登録すれば、インストール等の作業に手間を取られることなく、すぐに機械学習のコードを実行することができます。AIや機械学習に関するページで説明されるPython コードを自分の手で実行したいと希望する方は、Googleのアカウント登録、および、GitHubのアカウントの登録をすることをお勧めします。両方とも無料で行えます。
Last updated: 2022.9.20(first uploaded 2018.5.30)
Object Detection (物体検出)とは |
2012年開催された大規模画像認識のコンペILSVRC(ImageNet Large Scale Visual Recognition Challenge) でAlexNetが圧倒的な成績で優勝して以来、ディープラーニングの手法(CNN)が画像分類での主役に躍り出ました。 2014年に開催されたILSVRCでの優勝者はGoogLeNetでした。GoogLeNetは複雑に見える構成ですが、基本的には、AlexNetのようなCNNと本質的には同じです。ただ、GoogLeNetには、縦方向に深さがあるだけでなく、横方向にも深さがあるという点で異なっています。横方向の幅はinception構造と呼ばれています(Inceptionモデルと呼ばれます) 。
このとき、VGGは2位の成績に終わりましたが、シンプルな構成なので応用面ではよく使用されます。ちなみに、VGGでは、3x3のフィルターによる畳み込み層を2回から4回連続して、プーリング層でサイズを半分にするという処理を繰り返します。重みのある層を16層にしたモデルをVGG16、19層にしたものをVGG19と呼んでいます。
2015年のILSVRCでの優勝者はResNetで、Microsoftのチームによって開発されたニューラルネットワークでした。その特徴は、層を深くしすぎると過学習などの問題が起きるのを回避するために、スキップ構造(ショートカット)と呼ばる概念を導入した点です。ResNetは、VGGのネットワークをベースにして、スキップ構造を取り入れて、層を深くしています。具体的には、畳み込み層を2層おきにスキップしてつなぎ、層を150層以上まで深くしています。ILSVRCのコンペでは、誤認識率が3.5%という驚異的な成果を出しています。
現実の課題として、例えば、自動車の自動運転を実現するためには、センサーから入手したデータから一般物体(人間、車、歩道、樹木など)の検出を可能とするソフトウエアが必要です。コンピュータビジョンの分野における物体検出(Object Detection)とは、ある画像の中から定められた物体の位置とカテゴリー(クラス)を検出することを指します。物体検出の問題は、性質のわからない、数が不明な物体をビデオ画像やカメラ画像から特定するという問題になります。だから、画像からの物体検出は、同時に2つの問題を解決する必要があります。画像の特定の領域が物体であるかどうかを判断し、どの物体であるかを調べる。後者の部分は画像分類にあたるので、画像識別のモデルを使えば解決できます。が、前者の部分と後者の部分を同時に解決するためには新しいモデルが必要です。
画像分類と物体検出に用いられるデータセットはまったく異なります。Classification(画像分類)でよく利用されるデータセットは MNIST データセットや ImageNet の画像セット、Kaggle のイメージ画像などです。一方、物体検出の精度の比較によく用いられているデータセットは PASCAL VOC2007 と PASCAL VOC2012 、あるいは、別の年度の PASCAL VOC や MS COCO などのデータセットです。また、物体検出の分野で重要とされている指標は、mAP (mean Average Precision) と FPS (Frame Per Second) です。PASCAL VOC2007のデータセットは、以下のような分類となっています。
20 classes:
Person: person
Animal: bird, cat, cow, dog, horse, sheep
Vehicle: aeroplane, bicycle, boat, bus, car, motorbike, train
Indoor: bottle, chair, dining table, potted plant, sofa, tv/monitor
Train/validation/test: 9,963 images containing 24,640 annotated objects
MS COCO (Microsoft Common Object in Context) データセットは、Microsoft が提供しているアノテーション付きの画像データです。以下のように80 classesに分類されたデータセットです。
person, bicycle, car, motorbike, aeroplane, bus, train, truck, boat, traffic light,
fire hydrant, stop sign, parking meter, bench,
bird, cat, dog, horse, sheep, cow, elephant, bear, zebra, giraffe
backpack, umbrella, handbag, tie, suitcase, frisbee, skis, snowboard, sports ball, kite
baseball bat, baseball glove, skateboard, surfboard, tennis racket, bottle, wine glass,
cup, fork, knife, spoon, bowl, banana, apple, sandwich, orange, broccoli, carrot
hot dog, pizza, donut, cake, chair, sofa, pottedplant, bed, diningtable, toilet, tvmonitor
laptop, mouse, remote, keyboard, cell phone, microwave, oven, toaster, sink, refrigerator
book, clock, vase, scissors, teddy bear, hair drier, toothbrush
TensorFlowなどのライブラリに実装されている物体検出のアルゴリズムは
Region Proposal : 物体らしい箇所を検出
Classification : 検出箇所のラベル分類
Bounding Box Regression : 正確な物体を囲う位置座標を推定
という 3 phase に大きく別れています。
Deep Learning(CNN)を応用した一般物体検出アルゴリズムで有名なものとしては、3種類挙げられます。R-CNN (Regions with CNN features)の発展系Faster R-CNN、YOLO(You Only Look Once)、SSD: Single Shot MultiBox Detectorに大別できます。
以下では、最初に、SSDとR-CNN (Regions with CNN features)のアルゴリズムをTensorFlow Object Detection API 及び TensorFlow Hub を用いて実装する事例を紹介します。また、YOLO系アルゴリズムを Darknet と呼ばれるプラットフォームで実現する事例についても紹介します。
Object Detection APIを用いた物体検出 |
TensorFlow Object Detection API を活用すると、学習済みモデルを用いた画像からの物体検出およびライブ映像からの物体検出が容易に実行できます。Object Detection APIで使用できる学習済みモデルについては、detection_model_zooに記述されています。これらのモデルはthe COCO dataset、 the Kitti dataset、 the Open Images dataset、 the AVA v2.1 dataset または the iNaturalist Species Detection Datasetで学習済みです。 COCO データセットで学習されたモデルの代表的なものは以下の通りです。
ssd_mobilenet_v1_coco
ssd_mobilenet_v2_coco
ssd_inception_v2_coco
faster_rcnn_inception_v2_coco
faster_rcnn_resnet50_coco
mask_rcnn_inception_v2_coco
TensorFlow Object Detection APIを利用するために、モジュールをこのサイトからダウンロードして下さい。
$ mkdir Tensorflow
$ cd Tensorflow
$ git clone https://github.com/tensorflow/models.git
modelsという名前で展開されますので、tensorflow/modelsという名前のディレクトリに保存されます。ここで説明するObject Detection APIのノートブックは、Googole Colab で実行できます。以下の説明は、TensorFlowのGitHubのrepoをダウンロードして、利用する際に必要な手続きです。Google Colab を活用するときは、無視してください。
Tensorflow Object Detection API は configure model and training parametersの過程でProtobufs を使用しますので、Protobuf librariesをコンパイルする必要があります。 tensorflow/models/research/ ディレクトリで、ターミナルから
$ cd models/research

# Compile protos.
$ protoc object_detection/protos/*.proto --python_out=.

# Install TensorFlow Object Detection API.
$ cp object_detection/packages/tf2/setup.py .
$ python -m pip install --use-feature=2020-resolver .
と入力します。エラーが表示されるときは、Object Detection API Demo に記載されているthe installation instructionsを参照して下さい。
Cocoapiを使用するときは、 pycocotools subfolder を tensorflow/models/research ディレクトリにコピーする必要があります。以下のように入力します。
$ git clone https://github.com/cocodataset/cocoapi.git
$ cd cocoapi/PythonAPI
$ make
$ cp -r pycocotools tensorflow/models/research/
次に、 Jupyter Notebookを用いて、 tensorflow/models/research/object_detection/colab_tutorials/ ディレクトリに行って、object_detection_tutorial.ipynb を開いて下さい。Object Detection API Demoというノートブックが表示されます。以下にその内容を示します。
import os
import pathlib

if "models" in pathlib.Path.cwd().parts:
  while "models" in pathlib.Path.cwd().parts:
    os.chdir('..')
elif not pathlib.Path('models').exists():
  !git clone --depth 1 https://github.com/tensorflow/models

!cd models/research/

import numpy as np
import os
import six.moves.urllib as urllib
import sys
import tarfile
import tensorflow as tf
import zipfile

from collections import defaultdict
from io import StringIO
from matplotlib import pyplot as plt
from PIL import Image
from IPython.display import display

from object_detection.utils import ops as utils_ops
from object_detection.utils import label_map_util
from object_detection.utils import visualization_utils as vis_util

# patch tf1 into `utils.ops`
utils_ops.tf = tf.compat.v1

# Patch the location of gfile
tf.gfile = tf.io.gfile

def load_model(model_name):
  base_url = 'http://download.tensorflow.org/models/object_detection/'
  model_file = model_name + '.tar.gz'
  model_dir = tf.keras.utils.get_file(
    fname=model_name,
    origin=base_url + model_file,
    untar=True)

  model_dir = pathlib.Path(model_dir)/"saved_model"

  model = tf.saved_model.load(str(model_dir))
  model = model.signatures['serving_default']

  return model

# List of the strings that is used to add correct label for each box.
PATH_TO_LABELS = 'models/research/object_detection/data/mscoco_label_map.pbtxt'
category_index = label_map_util.create_category_index_from_labelmap(PATH_TO_LABELS, use_display_name=True)

# If you want to test the code with your images, just add path to the images to the TEST_IMAGE_PATHS.
PATH_TO_TEST_IMAGES_DIR = pathlib.Path('models/research/object_detection/test_images')
TEST_IMAGE_PATHS = sorted(list(PATH_TO_TEST_IMAGES_DIR.glob("*.jpg")))
上記のコードは Jupyter Notebook にコピペして、実行して下さい。以下同様です。次に、モデルをロードし、画像から検出を行ます。ここで使用される学習済みモデルは、 'ssd_mobilenet_v1_coco_2017_11_17' です。
model_name = 'ssd_mobilenet_v1_coco_2017_11_17'
detection_model = load_model(model_name)

print(detection_model.inputs)

detection_model.output_dtypes
detection_model.output_shapes

def run_inference_for_single_image(model, image):
  image = np.asarray(image)
  # The input needs to be a tensor, convert it using `tf.convert_to_tensor`.
  input_tensor = tf.convert_to_tensor(image)
  # The model expects a batch of images, so add an axis with `tf.newaxis`.
  input_tensor = input_tensor[tf.newaxis,...]

  # Run inference
  output_dict = model(input_tensor)

  # All outputs are batches tensors.
  # Convert to numpy arrays, and take index [0] to remove the batch dimension.
  # We're only interested in the first num_detections.
  num_detections = int(output_dict.pop('num_detections'))
  output_dict = {key:value[0, :num_detections].numpy()
                 for key,value in output_dict.items()}
  output_dict['num_detections'] = num_detections

  # detection_classes should be ints.
  output_dict['detection_classes'] = output_dict['detection_classes'].astype(np.int64)

  # Handle models with masks:
  if 'detection_masks' in output_dict:
    # Reframe the the bbox mask to the image size.
    detection_masks_reframed = utils_ops.reframe_box_masks_to_image_masks(
              output_dict['detection_masks'], output_dict['detection_boxes'],
               image.shape[0], image.shape[1])
    detection_masks_reframed = tf.cast(detection_masks_reframed > 0.5,
                                       tf.uint8)
    output_dict['detection_masks_reframed'] = detection_masks_reframed.numpy()

  return output_dict

def show_inference(model, image_path):
  # the array based representation of the image will be used later in order to prepare the
  # result image with boxes and labels on it.
  image_np = np.array(Image.open(image_path))
  # Actual detection.
  output_dict = run_inference_for_single_image(model, image_np)
  # Visualization of the results of a detection.
  vis_util.visualize_boxes_and_labels_on_image_array(
      image_np,
      output_dict['detection_boxes'],
      output_dict['detection_classes'],
      output_dict['detection_scores'],
      category_index,
      instance_masks=output_dict.get('detection_masks_reframed', None),
      use_normalized_coordinates=True,
      line_thickness=8)

  display(Image.fromarray(image_np))

for image_path in TEST_IMAGE_PATHS:
  show_inference(detection_model, image_path)
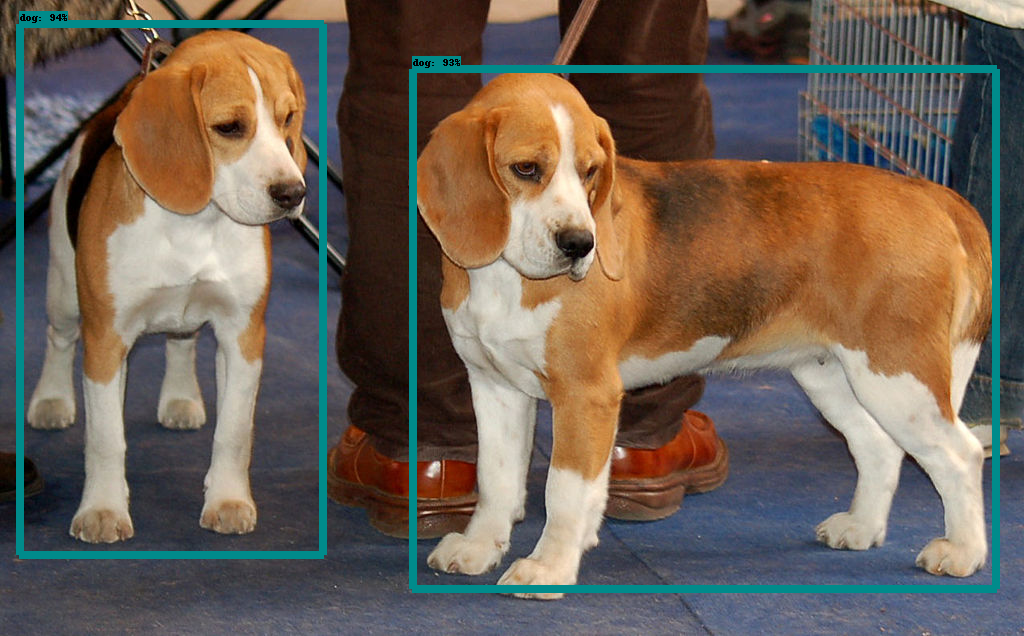
検出結果は以下のような表示となります。
このObject Detection API をwebcamera からのライブ映像を読み込めるように改変したコードがこのGithub repo に紹介されています。興味のある方は参考になると思います。
TensorFlow Hub を用いた物体検出 |
はじめに、TensorFlow Hubをインストールしましょう。
$ pip install --upgrade tensorflow-hub
TensorFlow Hub を用いた物体検出のファイルは、公式サイトのgithubにあります。このGitHubにある object_detection.ipynb を開いて下さい。以下のようなPython セルが表示されています。このノートブックも、Google Colabで実行できます。
#@title Imports and function definitions

# For running inference on the TF-Hub module.
import tensorflow as tf

import tensorflow_hub as hub

# For downloading the image.
import matplotlib.pyplot as plt
import tempfile
from six.moves.urllib.request import urlopen
from six import BytesIO

# For drawing onto the image.
import numpy as np
from PIL import Image
from PIL import ImageColor
from PIL import ImageDraw
from PIL import ImageFont
from PIL import ImageOps

# For measuring the inference time.
import time

def display_image(image):
  fig = plt.figure(figsize=(20, 15))
  plt.grid(False)
  plt.imshow(image)


def download_and_resize_image(url, new_width=256, new_height=256,
                              display=False):
  _, filename = tempfile.mkstemp(suffix=".jpg")
  response = urlopen(url)
  image_data = response.read()
  image_data = BytesIO(image_data)
  pil_image = Image.open(image_data)
  pil_image = ImageOps.fit(pil_image, (new_width, new_height), Image.ANTIALIAS)
  pil_image_rgb = pil_image.convert("RGB")
  pil_image_rgb.save(filename, format="JPEG", quality=90)
  print("Image downloaded to %s." % filename)
  if display:
    display_image(pil_image)
  return filename


def draw_bounding_box_on_image(image,
                               ymin,
                               xmin,
                               ymax,
                               xmax,
                               color,
                               font,
                               thickness=4,
                               display_str_list=()):
  """Adds a bounding box to an image."""
  draw = ImageDraw.Draw(image)
  im_width, im_height = image.size
  (left, right, top, bottom) = (xmin * im_width, xmax * im_width,
                                ymin * im_height, ymax * im_height)
  draw.line([(left, top), (left, bottom), (right, bottom), (right, top),
             (left, top)],
            width=thickness,
            fill=color)

  # If the total height of the display strings added to the top of the bounding
  # box exceeds the top of the image, stack the strings below the bounding box
  # instead of above.
  display_str_heights = [font.getsize(ds)[1] for ds in display_str_list]
  # Each display_str has a top and bottom margin of 0.05x.
  total_display_str_height = (1 + 2 * 0.05) * sum(display_str_heights)

  if top > total_display_str_height:
    text_bottom = top
  else:
    text_bottom = bottom + total_display_str_height
  # Reverse list and print from bottom to top.
  for display_str in display_str_list[::-1]:
    text_width, text_height = font.getsize(display_str)
    margin = np.ceil(0.05 * text_height)
    draw.rectangle([(left, text_bottom - text_height - 2 * margin),
                    (left + text_width, text_bottom)],
                   fill=color)
    draw.text((left + margin, text_bottom - text_height - margin),
              display_str,
              fill="black",
              font=font)
    text_bottom -= text_height - 2 * margin


def draw_boxes(image, boxes, class_names, scores, max_boxes=10, min_score=0.1):
  """Overlay labeled boxes on an image with formatted scores and label names."""
  colors = list(ImageColor.colormap.values())

  try:
    font = ImageFont.truetype("/usr/share/fonts/truetype/liberation/LiberationSansNarrow-Regular.ttf",
                              25)
  except IOError:
    print("Font not found, using default font.")
    font = ImageFont.load_default()

  for i in range(min(boxes.shape[0], max_boxes)):
    if scores[i] >= min_score:
      ymin, xmin, ymax, xmax = tuple(boxes[i])
      display_str = "{}: {}%".format(class_names[i].decode("ascii"),
                                     int(100 * scores[i]))
      color = colors[hash(class_names[i]) % len(colors)]
      image_pil = Image.fromarray(np.uint8(image)).convert("RGB")
      draw_bounding_box_on_image(
          image_pil,
          ymin,
          xmin,
          ymax,
          xmax,
          color,
          font,
          display_str_list=[display_str])
      np.copyto(image, np.array(image_pil))
  return image
学習済みモデルは、FasterRCNN+InceptionResNet V2( high accuracy)、または、ssd+mobilenet V2( small and fast)のいずれかを使用できます。使用する画像はOpen Images v4から取ります。
image_url = "https://farm1.staticflickr.com/4032/4653948754_c0d768086b_o.jpg"  #@param
downloaded_image_path = download_and_resize_image(image_url, 1280, 856, True)

module_handle = "https://tfhub.dev/google/openimages_v4/ssd/mobilenet_v2/1"
# "https://tfhub.dev/google/faster_rcnn/openimages_v4/inception_resnet_v2/1"

detector = hub.load(module_handle).signatures['default']

def load_img(path):
  img = tf.io.read_file(path)
  img = tf.image.decode_jpeg(img, channels=3)
  return img

def run_detector(detector, path):
  img = load_img(path)

  converted_img  = tf.image.convert_image_dtype(img, tf.float32)[tf.newaxis, ...]
  start_time = time.time()
  result = detector(converted_img)
  end_time = time.time()

  result = {key:value.numpy() for key,value in result.items()}

  print("Found %d objects." % len(result["detection_scores"]))
  print("Inference time: ", end_time-start_time)

  image_with_boxes = draw_boxes(
      img.numpy(), result["detection_boxes"],
      result["detection_class_entities"], result["detection_scores"])

  display_image(image_with_boxes)

run_detector(detector, downloaded_image_path)
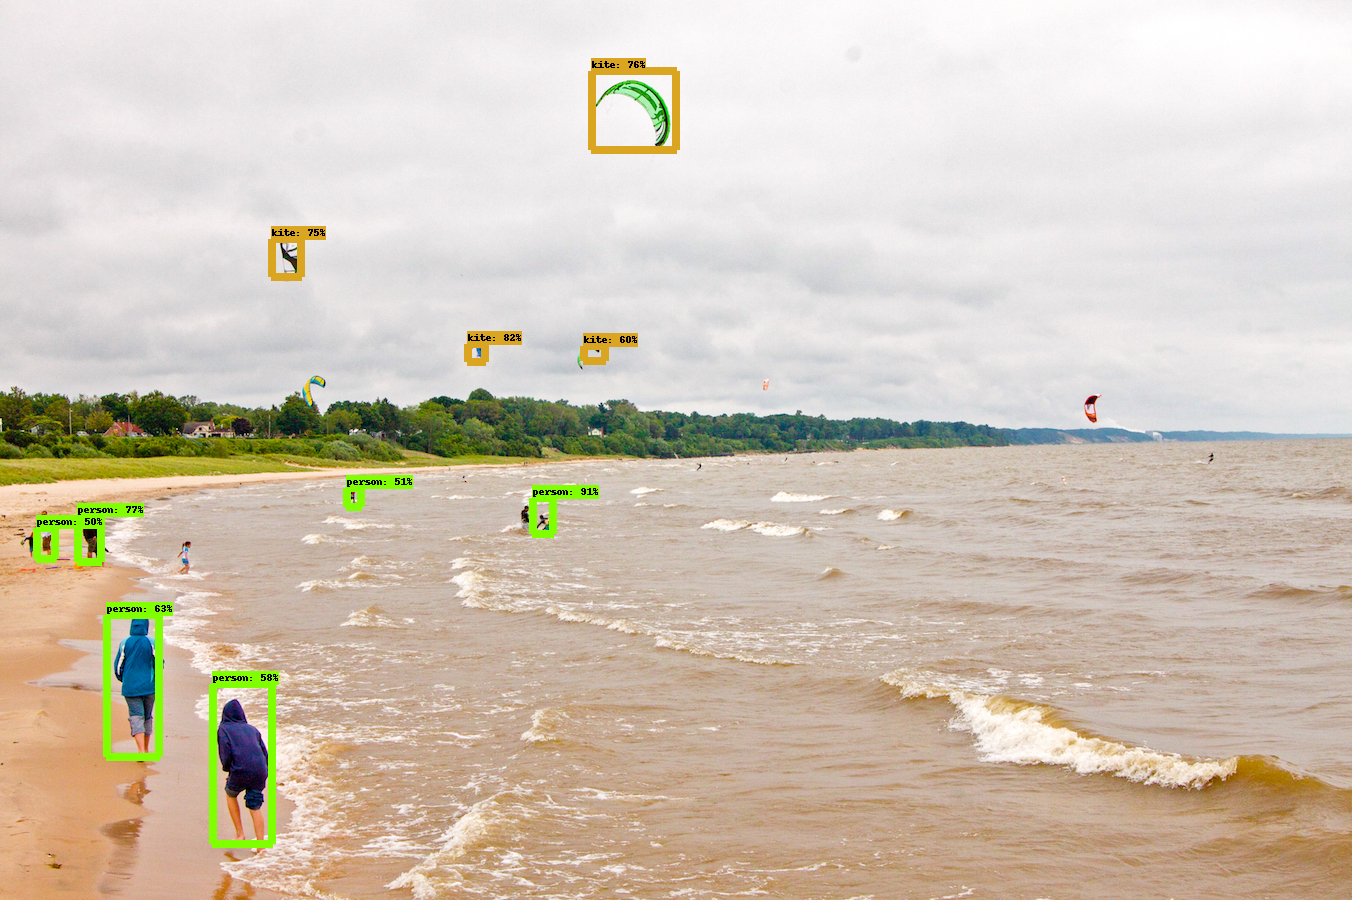
以上のコードを実行すると、以下のような検出された物体の表示がされます。Google Colabを用いて実行すれば、もう少し多くの画像を表示することができます。
YOLO(You Only Look Once) Using TensorFlow 2 |
YOLO(You Only Look Once)とは、畳み込みニューラルネットワーク(CNN:Convolutional Neural Network)を用いた物体検出アルゴリズムの一つです。現時点ではYolo-v4からYolo-v7までのアップグレードが存在します。また、Tiny YOLOというサイズの小さなバージョンも開発されています。YOLOは、SSDの物体検出アルゴリズムとは異なり、画像をバウンディングボックスで分割してクラス分類を行なっている。このモデルはTensorFlow や PyTorch などには依存しません。YOLOv3の公式サイトはここです
YOLOアルゴリズムを TensorFlowで実行できるように変換することができます。TensorFlow 1.xでは正常に動作するライブラリが多数存在しますが、TensorFlow 2.0 に対応したバージョンは多くはありません。 ここで紹介する実装例はGithubにアップされているYoloV3 Implemented in Tensorflow 2です。このGithubのリポジトリを git clone します。
git clone https://github.com/zzh8829/yolov3-tf2
yolov3-tf2というフォルダーの中にプログラムがインストールされます。
物体検出にこのモジュールを活用してみましょう。学習済みモデルYOLOv3を読み込み、モデルをTensorflow向けに変換するために以下のように入力します。シェルプロンプトは ディレクトリ yolov3-tf2 において下さい。
# install yolov3.tf
$ wget https://pjreddie.com/media/files/yolov3.weights -O data/yolov3.weights
$ python convert.py --weights ./data/yolov3.weights --output ./checkpoints/yolov3.tf

# install yolov3-tiny.tf
$ wget https://pjreddie.com/media/files/yolov3-tiny.weights -O data/yolov3-tiny.weights
$ python convert.py --weights ./data/yolov3-tiny.weights --output ./checkpoints/yolov3-tiny.tf --tiny
これでTernsorflowで使用できる学習済みモデル yolov3 及び yolov3-tiny が準備できました。次に、写真から物体検出をしてみましょう。以下の様にコマンドを打ちます。
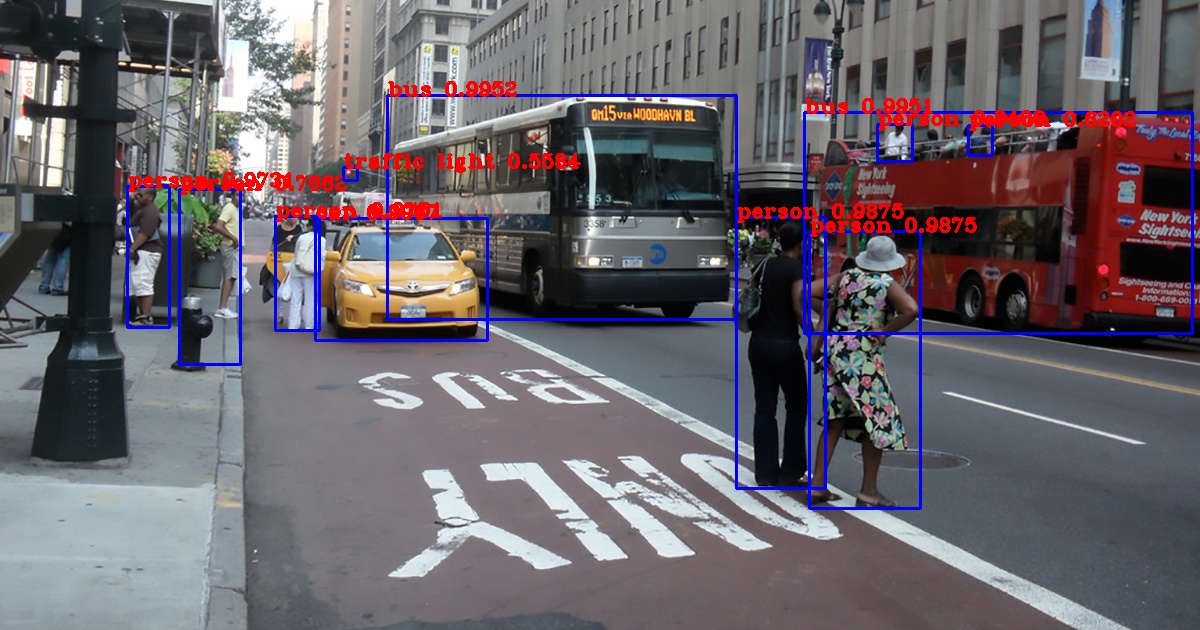
# yolov3
$ python detect.py --image ./data/street.jpg
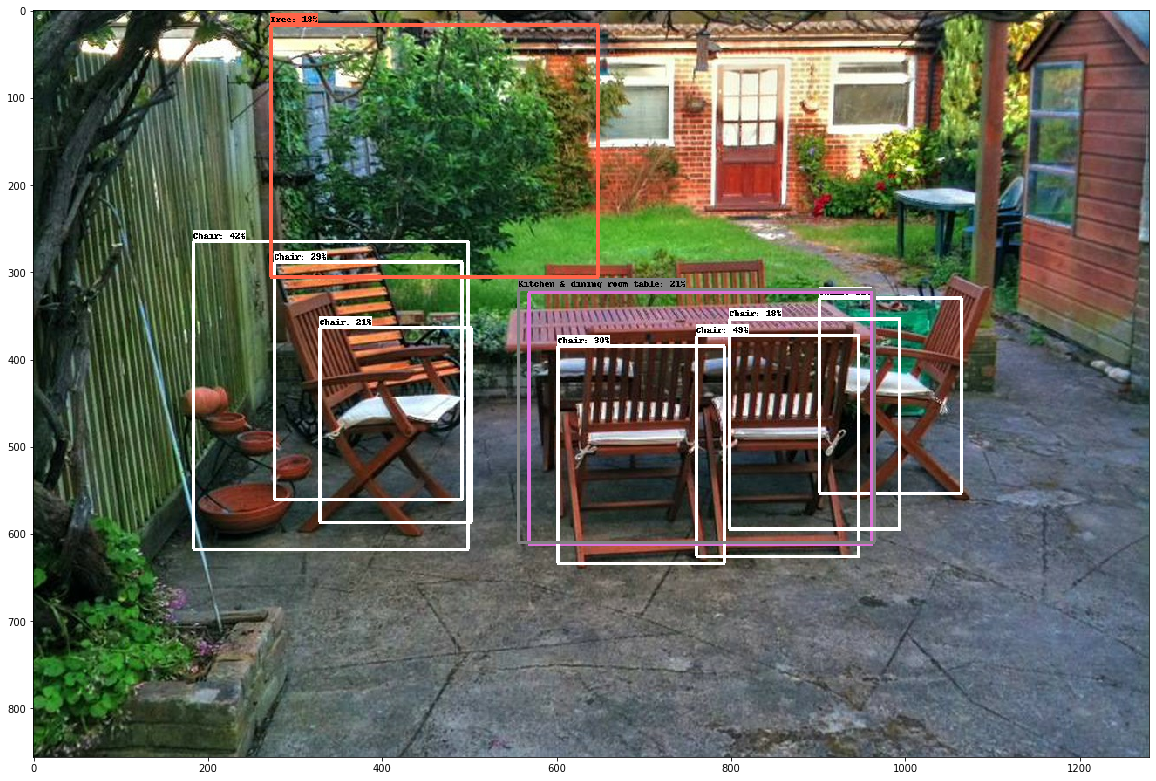
output.jpgに以下のような結果が出力されます
yolov3-tiny を使用するときは
# yolov3-tiny
$ python detect.py --weights ./checkpoints/yolov3-tiny.tf --tiny --image ./data/street.jpg
と実行します。yolov3 に比較してモデルが非常に小さくなっているので、その分、物体検出の精度は悪いです。
yolov3 を用いて、webcamera からのライブ映像から物体検出を実行するためには
$ python detect_video.py --video 0
と入力します。Tensorflow Object Detection API に比較して処理スピードはかなり速いです。
yolov3 を用いて、video 動画映像から物体検出を実行するためには
$ python detect_video.py --video path_to_file.mp4 --weights ./checkpoints/yolov3-tiny.tf --tiny
と入力します。
Google Colab で実行するときは、yolov3_colab_gpuを利用して下さい。
なお、YoloV5 の実行コードについては、https://github.com/ultralytics/yolov5を見てください。YoloV7 の実行コードについては、https://github.com/wongkinyiu/yolov7を参照してください。しかし、これらの Repo で公開されているコードは PyTorch 向けに書かれたものなので、PyTorch のページにて取り上げます。
PyTorchでObject Detectionのページに移る
ご質問、コメントなどは こちらからメール送信して下さい。