OpenCV 入門 |
画像処理のOSSとして最もシンプルな構造を持つソフトはOpenCV(Open Source Computer Vision)だと思われます。 1999年、Intelの Gary Bradskyによって開発され、 2000年に発表された。その後、Vadim Pisarevskyたちが加わり、2008年以降、Willow Garageの支援を得て、Open Sourceとして開発が活発に行われてきました。現在、OpenCVのバージョンは4.xです。Windows, Linux, OS Xなどのクロス・プラットホームで作動します。利用できる言語はPython, C++, Javaなどです。OpenCV の公式サイトは opencv.orgです。
このページでは、OpenCV-Python、つまり、the Python API of OpenCVを用います。個人的理由からMacOS上で使用しますが、WindowsやLinuxなどと異なるのはインストールの仕方だけです。OpenCV 4.xバージョンを使用します。言語環境としては基本的にはPythonとそのモジュールNumpyとMatplotlibが必須です。これらのPython関連パッケージがインストールしてあることを前提にします。インタラクティブ環境のJupyter Notebookも使用可能な状態にあることも前提です。
OpenCVはコンピュータービジョンライブラリの重要なものの1つであり、ディープラーニング推論を実行するための機能(OpenCV DNN module)も追加されてきた。これを使用して、多くのの深層学習機能を実行できます。各種のフレームワークのモデルをサポートする機能は、現在のバージョンのOpenCVの一部になっています。
自動車の自動運転などに応用されるCaffeのような畳み込みニューラルネットワークの学習済みモデルを用いれば、1000種類以上の画像識別が可能です。OpenCVでは、Caffeを始めとして、Tensorflow、Pytorch、あるいは、DarknetなどのPython/C++ APIで開発されてきたDNNモデルを利用して画像識別や物体検出を実行することが可能になっています。しかし、OpenCVはディープラーニングの学習機能を含んでいないので、そうしたPython/C++ APIまでの能力はありません。その代わり、構造はシンプルで、動作は非常に軽く、使いやすいです。iOSやAndroidなどをプラットホームとするモバイル機器でも利用できます。画像処理の初心者にも容易に使いこなせます。
OpenCVの基本的なTutorialsは、 このopencv-tutorialです。また、DNNモジュールの活用についての説明は、公式サイトのページを参考にして下さい。このページで使用されるサンプルコードの多くは、 このgithub repoにありますので、ダウンロードして使用して下さい。
Last updated: 2022.4.14
OpenCV-Pythonのインストールと初歩的画像処理 |
Python 3.xを使用しているとして、opencv-pythonを以下のようなコマンドを入力してインストールします。opencv-contrib-pythonはここでは使用しません。
$ pip install opencv-python
$ pip install opencv-contrib-python #not neccessary for the present task
インストールできたかどうかを見るために、
$ python -c "import cv2; print( cv2.__version__ )"
とPythonを実行します。cv2のバージョンが4.5であることを確認します。正常にインストールされているでしょう。
OpenCVでの画像処理の初歩的コマンドは、画像を読む、画像を表示する、画像を保存する3種類の関数、cv2.imread(), cv2.imshow() , cv2.imwrite() です。 画像処理ライブラリでは、cv2.imreadメソッドを用いることで画像を読みみます。
書式は
img = cv2.imread(filename[,flag])
と入力します。ここで、filenameは読み込む画像のファイル名、flag=1ならoriginalのまま、0ならグレースケール、-1ならRGBの画像として読み込まれます。デフォルトはflag=1です。
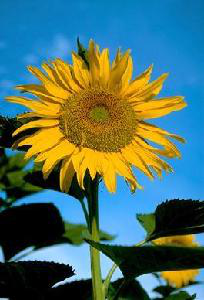
画像はNumPy配列(読み込んだ画像の画素値を格納)で、読み込みに対応している画像ファイル形式は、「jpg」「png」「bmp」「pgm」「pbm」「ppn」「dib」「jp2」「tiff」「tf」「ras」「sr」です。通常のNumPy配列と同様に、print関数で中身を確認できます。読み込み画像"flower.jpg"をワーキング・ディレクトリに保存して、Jupyter Notebookを起動して、以下のコードを入力してください。
import cv2
import numpy as np

img = cv2.imread("flower.jpg")
np.shape(img)
print (img)
読み込まれた画像の配列次元と中身がndarrayで表示されます。
この画像は、(300, 204, 3)次元配列なので、横300x縦204個のpixel(ピクセル)x3から構成されていることがわかる。ピクセルを画素とも言います。画像はカラーなので、RGB(赤・緑・青)の3色で表されるので、数字の 3 はこれを意味します。
なので、各画素の値は3次元配列で保存されています。このように、1つの画素の色を、R(赤)、G(緑)、B(青)の3原色を混ぜ合わせて表現する画像をRGBカラー画像といいます。RGBカラー画像では、R, G, Bそれぞれの濃度を256階調(0~255 = 8bit)の整数値で表します。R, G, Bそれぞれの濃さを8bitで表現するため、1画素の色は24bit(=8bit×3色分)で表現されます。数値は(R, G, B)=(赤の濃度, 緑の濃度, 青の濃度)を表現します。画素の値は3色の3次元空間の点で表現されるので、3次元配列になります。
画像を表示するために、
cv2.imshow('image',img)
cv2.waitKey(0)
cv2.destroyAllWindows()
と入力します。cv2.waitKey() はミリ秒単位でキーボードからの入力を待つという意味です。cv2.destroyAllWindows()は作成されたウインドウを消す命令文です。
画像を保存するときは
cv2.imwrite('sunflower.png',img)
と入力します。第1引数は保存先のファイル名で、第2引数は読み込んだ画像名です。ワーキング・ディレクトリにsunflower.pngという画像ファイルが作成されます。作成された画像は
です。Matplotlibを用いて画像を表示する場合には、以下のように入力します。
from matplotlib import pyplot as plt

img = cv2.imread('flower.jpg',0)
plt.imshow(img, cmap = 'gray', interpolation = 'bicubic')
plt.xticks([]), plt.yticks([])  # to hide tick values on X and Y axis
plt.show()
このケースでは、imread()の第2引数が0になっているので、グレースケール(白黒画像)で読み込まれています。 なので、表示される画像は
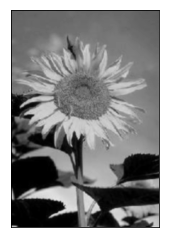
となります。実は、matplotlibは、画像がRGBで入ってくることを期待しています。OpenCVで読み込んだ画像はBGR形式なので、そのままmatplotlibで表示するとおかしな画像になります。なので、カラーの順番を変換する必要があります。
cv2.cvtColor(img, cv2.COLOR_BGR2RGB)
という変換文を挟む必要があります。
顔認証の学習済みモデル |
次に、人物の顔や目の検出のサンプル・コードの作成について取り上げます。顔の検出・認証をするには学習済みのモデルが必要になります。それは OpenCV 公式で用意されているものを利用します。Haar Feature-based Cascade Classifiersを使用した物体検出が便利です。このパッケージをインストールします。
$ git clone https://github.com/opencv/opencv.git
これらのOpenCVの検出用パッケージ(Haar-cascade Detection)は、opencv/data/haarcascades/以下のディレクトリに配置されます。その中身は以下の通りです。
  haarcascade_eye.xml
  haarcascade_eye_tree_eyeglasses.xml
  haarcascade_frontalcatface.xml
  haarcascade_frontalcatface_extended.xml
  haarcascade_frontalface_alt.xml
  haarcascade_frontalface_alt2.xml
  haarcascade_frontalface_alt_tree.xml
  haarcascade_frontalface_default.xml
  haarcascade_fullbody.xml
  haarcascade_lefteye_2splits.xml
  haarcascade_licence_plate_rus_16stages.xml
  haarcascade_lowerbody.xml
  haarcascade_profileface.xml
  haarcascade_righteye_2splits.xml
  haarcascade_russian_plate_number.xml
  haarcascade_smile.xml
  haarcascade_upperbody.xml
顔を検出して、黒に塗りつぶすコードは以下のようになります。使用する画像「sample.png」は自身で用意して下さい。
import cv2

# 画像の読み込み
imagefile = 'sample.png'
image = cv2.imread(imagefile)

# 顔認証のための学習済みモデル読み込み
cascade_path = 'opencv/data/haarcascades/haarcascade_frontalface_alt.xml'
cascade_face = cv2.CascadeClassifier(cascade_path)

# 顔認証実行
face_list = cascade_face.detectMultiScale(image)

for (x, y, w, h) in face_list:
# 顔を黒く塗りつぶす
    cv2.rectangle(img=image, pt1=(x, y), pt2=(x + w, y + h), color=(0, 0, 0), thickness=-1)

# 画像を保存
cv2.imwrite('detected.png', image)
以下のようなスクリプトを作成すると、写真(alumni2.jpg)から人物の顔の検出をした後、長方形の枠で囲むことが出来ます。
import numpy as np
import cv2

cascade_path = 'opencv/data/haarcascades/haarcascade_frontalface_alt.xml'
image = cv2.imread("sample.png")
color = (255,0,0)
gray = cv2.cvtColor(image, cv2.COLOR_BGR2GRAY)
cascade = cv2.CascadeClassifier(cascade_path)
facerect = cascade.detectMultiScale(gray, scaleFactor=1.3,
                      minNeighbors =1,minSize=(1,1))
if len(facerect) > 0:
    for rect in facerect:
        cv2.rectangle(image, tuple(rect[0:2]),tuple(rect[0:2]+rect[2:4]),color,thickness=2)
else:
    print("no face")
cv2.imshow("detected.jpg",image)

cv2.waitKey()
cv2.destroyAllWindows()
読み込んだ画像をグレースケール画像に変換して、 detectMultiScale という検出プログラムにかけます。そのあと、 rectangle()というプログラムで読み込んだ画像の人物の顔を長方形の彩色枠で囲みます。結果画像は

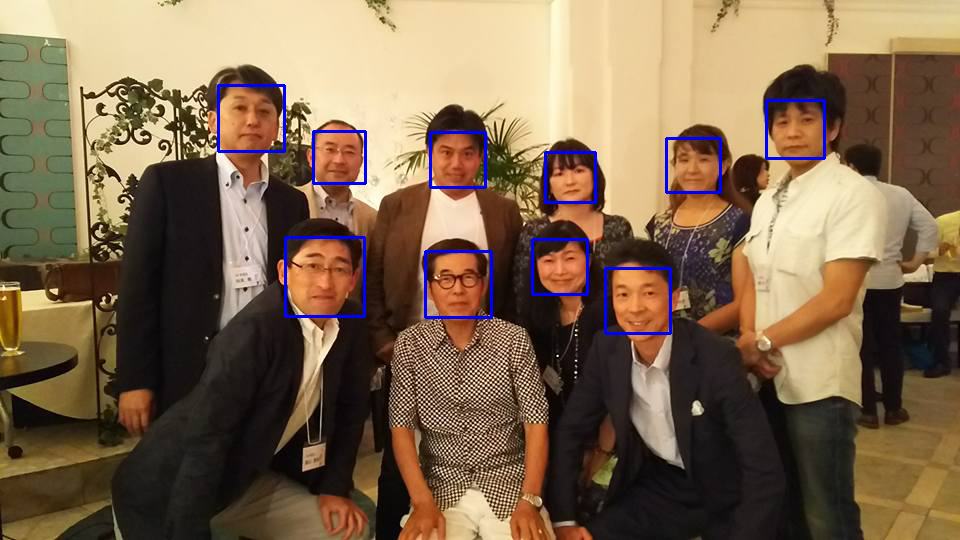
となって、人物の顔が検出されています。画像の縮小率(scaleFactor)が結果に影響を与えます。値の大小により検出に間違いが起こります。縮小率の設定には試行錯誤が必要で、微妙です。画像の表示を終了するためには、「q」キーを打って下さい。
次に、顔の中の目の部分を四角形枠で囲むためのコードを見てみましょう。
import numpy as np
import cv2
from matplotlib import pyplot as plt

face_cascade = cv2.CascadeClassifier('opencv/data/haarcascades/haarcascade_frontalface_default.xml')
eye_cascade = cv2.CascadeClassifier('opencv/data/haarcascades/haarcascade_eye.xml')

img = cv2.imread('sample.png')
gray = cv2.cvtColor(img, cv2.COLOR_BGR2GRAY)

faces = face_cascade.detectMultiScale(gray, 1.1, 5)

for (x,y,w,h) in faces:
    cv2.rectangle(img,(x,y),(x+w,y+h),(255,0,0),2)
    roi_gray = gray[y:y+h, x:x+w]
    roi_color = img[y:y+h, x:x+w]

    eyes = eye_cascade.detectMultiScale(roi_gray)
    for (ex,ey,ew,eh) in eyes:
        cv2.rectangle(roi_color,(ex,ey),(ex+ew,ey+eh),(0,255,0),2)

cv2.imshow('img',img)

cv2.waitKey(0)
cv2.destroyAllWindows()
縮小率などの理由により、顔の中にあるすべての目が検出されていません。理想的な検出はできていませんが、簡単な利用の方法は理解できたと思います。なお、opencv/samples/python/の中にすぐに利用可能な多数のpythonスクリプトがあります。
Webカメラからの画像をキャプチャーする |
Webカメラを映し出す方向に向けて設置して、usbコネクターをPCに接続してください。Jupyter Notebookを開いて、以下のpythonコードを作成してください。
import cv2

capture = cv2.VideoCapture(0)
if capture.isOpened() is False:
  raise IOError

while(True):
  try:
	ret, frame = capture.read()
	if ret is False:
	  raise IOError
	cv2.imshow('frame',frame)
	cv2.waitKey(1)
  except KeyboardInterrupt:
	# 終わるときは CTRL + C を押す
	break

capture.release()
cv2.destroyAllWindows()
capture = cv2.VideoCapture(0)とすると、PCに内臓のカメラからの映像になります。映像の保存は以下の通り行います。以下のコードをpythonスクリプトとして保存してください。
import numpy as np
import cv2

cap = cv2.VideoCapture(1)

# Define the codec and create VideoWriter object
fourcc = cv2.VideoWriter_fourcc(*'XVID')
out = cv2.VideoWriter('output.avi',fourcc, 20.0, (640,480))

while(cap.isOpened()):
    ret, frame = cap.read()
    if ret==True:
        frame = cv2.flip(frame,1)

        # write the flipped frame
        out.write(frame)

        cv2.imshow('frame',frame)
        if cv2.waitKey(1) & 0xFF == ord('q'): # qキーで終了
            break
    else:
        break

# Release everything if job is finished
cap.release()
out.release()
cv2.destroyAllWindows()
fourcc = cv2.VideoWriter_fourcc(*'XVID')の代わりに、fourcc = cv2.VideoWriter_fourcc(*'MJPG')とすると容量が大きくなります。映像の表示ができますが、output.aviで保存された画像ファイルがMacでは読めません。
Webカメラからの映像をキャプチャして、人物の顔や目を検出するプログラムを書いてみましょう。以下のコードをJupyter Notebookを用いて作成してください。
import numpy as np
import cv2


cap = cv2.VideoCapture(0)
if cap.isOpened() is False:
  raise IOError

face_cascade_path = "opencv/data/haarcascades/haarcascade_frontalface_default.xml"
eye_cascade_path = "opencv/data/haarcascades/haarcascade_eye.xml"

face_cascade = cv2.CascadeClassifier(face_cascade_path)
eye_cascade = cv2.CascadeClassifier(eye_cascade_path)


while True:
	ret, img = cap.read()
	gray = cv2.cvtColor(img, cv2.COLOR_BGR2GRAY)
	faces = face_cascade.detectMultiScale(gray, 1.5, 5)
	for (x,y,w,h) in faces:
	  cv2.rectangle(img,(x,y),(x+w,y+h),(255,0,0),2)
	  roi_gray = gray[y:y+h, x:x+w]
	  roi_color = img[y:y+h, x:x+w]
      eyes = eye_cascade.detectMultiScale(roi_gray)
      for (ex,ey,ew,eh) in eyes:
         cv2.rectangle(roi_color,(ex,ey),(ex+ew,ey+eh),(0,255,0),2)
	cv2.imshow('video image', img)
	key = cv2.waitKey(10)
	if key == 27:  # {CTRL+C}キーで終了
		break

cap.release()
cv2.destroyAllWindows()
このコードを実行すると、カメラからの映像表示に、ブルーの顔枠が書き込まれます。さらに、グリーンの目の枠を表示します。検出の結果表示と映像の動きには若干のタイムラグが起こります。鼻などもグリーンの枠で囲われるので、精度はあまり高くありません。
OpenCV DNN を用いた物体検出:Caffe編 |
OpenCVにおけるDeep Neural Networks (dnn module)の大まかな解説はTutorialsの目次をみて下さい。このtutorial_dnn_googlenet(C++)の解説はとてもわかりにくいので、理解しやすい解説を提供しているDeep Learning with OpenCV DNN Module: A Definitive GuideというLearnOpenCVのサイトを参考にします。
OpenCV DNNモジュールは、多くの一般的なディープラーニングフレームワークをサポートしています。以下は、OpenCV DNNモジュールがサポートするディープラーニングフレームワークです。
Caffe
OpenCV DNNで事前にトレーニングされたCaffeモデルを使用するには、2つのファイルが必要です。
1つは、事前にトレーニングされた重みを含むmodel.caffemodelファイルです。もう1つは、拡張子が.prototxtのモデルアーキテクチャファイルです。これは、すべてのニューラルネットワークレイヤーの定義を含むJSONのような構造を持つプレーンテキストファイルのようなものです。
TensorFlow
事前にトレーニングされたTensorFlowモデルを読み込むには、2つのファイルが必要です。モデルの重みファイルとprotobufテキストファイルです。重みファイルの拡張子は.pbで、事前にトレーニングされたすべてのウェイトを含むprotobuf形式のファイルです。モデル構成は、.pbtxtファイル拡張子を持つprotobufテキストファイルに保持されます。
TorchとPyTorch
Torchモデルファイルをロードするには、事前にトレーニングされたウェイトを含むファイルが必要です。通常、このファイルの拡張子は.t7または.netです。PyTorchの学習済みモデルでは、拡張子が.pth、または、.ptのファイルになっているので、これをONNX形式に変換するのが最善の方法です。ONNXに変換した後、ONNXモデルを読み込みます。
Darknet
OpenCV DNNモジュールは、有名なDarknetフレームワークもサポートしています。 Darknetフレームワークで公式のYOLOモデルを使用している場合が該当します。通常、Darknetモデルをロードするには、Caffeと同様に、モデルを記述した2種類のファイルが必要です。拡張子が.weightsの重みファイルと、ネットワーク構成ファイルである.cfgファイルの二つが必要です。
また、モデルの学習で用いられた画像データの分類を記述したクラスファイルが必要です。画像識別では、ILSVRC2012 classesによる分類が使用され、物体検出では、MS COCOやPascal VOCが採用されています。詳しくは、 公式サイトのwikiも参考になります。
OpenCV DNN でCaffeモデルをロードするためのモジュールはreadNetあるいは、readNetFromCaffe()を用います。画像識別のCaffeモデルを実装するためにDeep Learning with OpenCV DNN Module: A Definitive Guideで提供されているコードを使用してみます。以下がそのPythonスクリプトです。モデルの読み込みは、readNet()を用いて、
model = cv2.dnn.readNet(model='models/DenseNet_121.caffemodel', config='models/DenseNet_121.prototxt', framework='Caffe')
で行われています。readNetFromCaffe()モジュールを利用するときは、
model = cv2.dnn.readNetFromCaffe(caffeModel='models/DenseNet_121.caffemodel', prototxt='models/DenseNet_121.prototxt')
とします。
import cv2
import numpy as np
# read the ImageNet class names
with open('models/classification_classes_ILSVRC2012.txt', 'r') as f:
image_net_names = f.read().split('\n')
# final class names (just the first word of the many ImageNet names for one image)
class_names = [name.split(',')[0] for name in image_net_names]
# load the neural network model
model = cv2.dnn.readNet(model='models/DenseNet_121.caffemodel', config='models/DenseNet_121.prototxt', framework='Caffe')
# load the image from disk
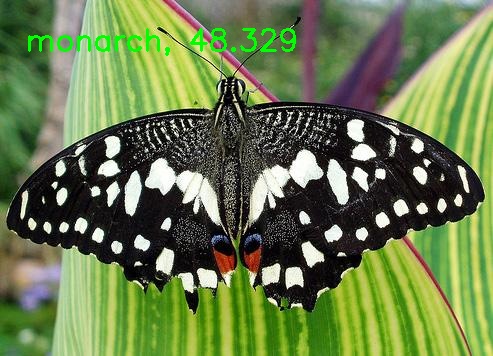
image = cv2.imread('images/butterfly.jpg')
# create blob from image
blob = cv2.dnn.blobFromImage(image=image, scalefactor=0.01, size=(224, 224),
mean=(104, 117, 123))
# set the input blob for the neural network
model.setInput(blob)
# forward pass image blog through the model
outputs = model.forward()
final_outputs = outputs[0]
# make all the outputs 1D
final_outputs = final_outputs.reshape(1000, 1)
# get the class label
label_id = np.argmax(final_outputs)
# convert the output scores to softmax probabilities
probs = np.exp(final_outputs) / np.sum(np.exp(final_outputs))
# get the final highest probability
final_prob = np.max(probs) * 100.
# map the max confidence to the class label names
out_name = class_names[label_id]
out_text = f"{out_name}, {final_prob:.3f}"
# put the class name text on top of the image
cv2.putText(image, out_text, (25, 50), cv2.FONT_HERSHEY_SIMPLEX, 1, (0, 255, 0),
2)
cv2.imshow('Image', image)
cv2.waitKey(0)
cv2.imwrite('result_image.jpg', image)
このスクリプトを classify.py として保存して下さい。ここで使用したCaffeモデルの2種類のファイルは、 DenseNet_121.caffemodel、 DenseNet_121.prototxtです。classification_classes_ILSVRC2012.txtは、OpenCVのGithub:opencv/opencv/samples/data/dnn/にあります。使用する画像は適当に用意して下さい。ディレクトリの構造は以下のようにします。
.
├──
├── classify.py
├── detect_cam.py
├── detect_img.py
├── images
│   ├── butterfly.jpg
│   ├── dog.jpg
│   └── tiger.jpg
├── models
│   ├── DenseNet_121.caffemodel
│   ├── DenseNet_121.prototxt
│   ├── classification_classes_ILSVRC2012.txt
│   ├── object_detection_classes_coco.txt
│   └── yolov5s.onnx
$ python classify.py
と実行すると、以下の画像がポップアップします。「q」キーを押すと画像は消えます。
OpenCV DNN を用いた物体検出:Tensorflow編 |
Tensorflowの学習済みモデルを利用したOpenCVの活用について、公式サイトのDeep Neural Networks (dnn module)のwikiに沿って説明します。このチュートリアルでは、TensorFlow(TF)分類モデルの凍結グラフを用いた物体検出の実行手順を説明しています。ただし、Tensorflowのコードがtensorflow 1.x の仕様になっていますので、tensorflow 2.xで実行するとエラーが出ます。
Tensorflowの学習済みモデルのダウンロード先は上記のDeep Neural Networks (dnn module)のwikiのページに記述されています。このサイトからダウンロードしたファイルを解凍して、その中の「frozen_inference_graph.pb」をmodels/ディレクトリに配置します。ssd_mobilenet_v2_coco_2018_03_29.pbtxtをダウンロードします。'ssd_mobilenet_v2_coco_2018_03_29.pbtxt'ファイルをmodels/ディレクトリに配置し、さらに、任意の画像sample.jpgをimages/ディレクトリ配置します。
次に、以下のpythonスクリプトを作成して、opencv_dnn.pyとして保存して下さい。
import cv2 as cv

cvNet = cv.dnn.readNetFromTensorflow('models/frozen_inference_graph.pb', 'models/ssd_mobilenet_v2_coco_2018_03_29.pbtxt')

img = cv.imread('images/dog.jpg')
rows = img.shape[0]
cols = img.shape[1]
cvNet.setInput(cv.dnn.blobFromImage(img, size=(300, 300), swapRB=True, crop=False))
cvOut = cvNet.forward()

for detection in cvOut[0,0,:,:]:
    score = float(detection[2])
    if score > 0.3:
        left = detection[3] * cols
        top = detection[4] * rows
        right = detection[5] * cols
        bottom = detection[6] * rows
        cv.rectangle(img, (int(left), int(top)), (int(right), int(bottom)), (23, 230, 210), thickness=2)

cv.imshow('img', img)
cv.waitKey()
このファイルを引数なしで実行すると、検出された物体に枠がついた画像が表示されます。このスクリプトでは物体名が表示されていないので、物体名を表示させます。以下のスクリプトを作成して下さい。detect_img.py というファイル名で保存して下さい。
import cv2
import numpy as np

# load the COCO class names
with open('models/object_detection_classes_coco.txt', 'r') as f:
    class_names = f.read().split('\n')

# get a different color array for each of the classes
COLORS = np.random.uniform(0, 255, size=(len(class_names), 3))

# load the DNN model
model = cv2.dnn.readNet('models/frozen_inference_graph.pb', 'models/ssd_mobilenet_v2_coco_2018_03_29.pbtxt','tensorflow')

# read the image from disk
image = cv2.imread('images/dog.jpg')
image_height, image_width, _ = image.shape
# create blob from image
blob = cv2.dnn.blobFromImage(image=image, size=(300, 300), crop=False,
                             swapRB=True)
# create blob from image
model.setInput(blob)
# forward pass through the model to carry out the detection
output = model.forward()

# loop over each of the detection
for detection in output[0,0]:
    # extract the confidence of the detection
    confidence = detection[2]
    # draw bounding boxes only if the detection confidence is above...
    # ... a certain threshold, else skip
    if confidence > .6:
        # get the class id
        class_id = detection[1]
        # map the class id to the class
        class_name = class_names[int(class_id)-1]
        color = COLORS[int(class_id)]
        # get the bounding box coordinates
        box_x = detection[3] * image_width
        box_y = detection[4] * image_height
        # get the bounding box width and height
        box_width = detection[5] * image_width
        box_height = detection[6] * image_height
        # draw a rectangle around each detected object
        cv2.rectangle(image, (int(box_x), int(box_y)), (int(box_width), int(box_height)), color, thickness=2)
        # put the FPS text on top of the frame
        cv2.putText(image, class_name, (int(box_x), int(box_y - 5)), cv2.FONT_HERSHEY_SIMPLEX, 1, color, 2)

cv2.imshow('image', image)
cv2.imwrite('image_result.jpg', image)
cv2.waitKey(0)
cv2.destroyAllWindows()
物体検出のためのクラス分類はcoco分類を使用するので、object_detection_classes_coco.txtファイルを用意します。このクラス分類ファイルをmodels/ディレクトリに配置します。object_detection_classes_coco.txtファイルは、OpenCVのgithubサイトの https://github.com/opencv/opencv/の中の、samples/data/dnn/にあります。
ファイル構成の構造は以下の通りです。
.
├── detect_cam.py
├── detect_img.py
├── images
│   ├── dog.jpg
│   ├── output.jpg
│   └── street.jpg
├── models
│   ├── frozen_inference_graph.pb
│   ├── object_detection_classes_coco.txt
│   └── ssd_mobilenet_v2_coco_2018_03_29.pbtxt
├── opencv_dnn.py
└── tf_object_detection.py
このpythonコードを実行すると物体名が表示されます。物体の名称はCOCOのデータ分類の90種類です。
webcamからのライブ映像での物体検出を行うときは、以下のスクリプトを作成して、opencv_cam.pyとして保存して下さい。
import cv2
import time
import numpy as np

# load the COCO class names
with open('models/object_detection_classes_coco.txt', 'r') as f:
    class_names = f.read().split('\n')

# get a different color array for each of the classes
COLORS = np.random.uniform(0, 255, size=(len(class_names), 3))

# load the DNN model
model = cv2.dnn.readNet('models/frozen_inference_graph.pb','models/ssd_mobilenet_v2_coco_2018_03_29.pbtxt', 'tensorflow')

# capture the video
cap = cv2.VideoCapture(1)
# get the video frames' width and height for proper saving of videos
frame_width = int(cap.get(3))
frame_height = int(cap.get(4))

# detect objects in each frame of the video
while cap.isOpened():
    ret, frame = cap.read()
    if ret:
        image = frame
        image_height, image_width, _ = image.shape
        # create blob from image
        blob = cv2.dnn.blobFromImage(image=image, size=(300, 300), mean=(104, 117, 123),
                                     swapRB=True)
        # start time to calculate FPS
        start = time.time()
        model.setInput(blob)
        output = model.forward()
        # end time after detection
        end = time.time()
        # calculate the FPS for current frame detection
        fps = 1 / (end-start)
        # loop over each of the detections
        for detection in output[0, 0, :, :]:
            # extract the confidence of the detection
            confidence = detection[2]
            # draw bounding boxes only if the detection confidence is above...
            # ... a certain threshold, else skip
            if confidence > .4:
                # get the class id
                class_id = detection[1]
                # map the class id to the class
                class_name = class_names[int(class_id)-1]
                color = COLORS[int(class_id)]
                # get the bounding box coordinates
                box_x = detection[3] * image_width
                box_y = detection[4] * image_height
                # get the bounding box width and height
                box_width = detection[5] * image_width
                box_height = detection[6] * image_height
                # draw a rectangle around each detected object
                cv2.rectangle(image, (int(box_x), int(box_y)), (int(box_width), int(box_height)), color, thickness=2)
                # put the class name text on the detected object
                cv2.putText(image, class_name, (int(box_x), int(box_y - 5)), cv2.FONT_HERSHEY_SIMPLEX, 1, color, 2)
                # put the FPS text on top of the frame
                cv2.putText(image, f"{fps:.2f} FPS", (20, 30), cv2.FONT_HERSHEY_SIMPLEX, 1, (0, 255, 0), 2)

        cv2.imshow('image', image)
        if cv2.waitKey(10) & 0xFF == ord('q'):
            break
    else:
        break

cap.release()
cv2.destroyAllWindows()
$ python opencv_cam.py
と実行すると、webcamからのライブ映像の物体検出の動画がポップアップします。
公式ページのtutorialsで提供されているpythonコードを利用するケースについて説明します。OpenCVのgithubサイトの https://github.com/opencv/opencv/ をダウンロードします。
$ git clone https://github.com/opencv/opencv.git
opencv/samples/dnn/の中に配置されている329行のpythonスクリプトで、object_detection.pyというファイルを使用します。opencv/samples/dnn/ディレクトリ内に、上の例で使用した学習済みモデルの frozen_infrence_graph.pb と ssd_mobilenet_v2_coco_2018_03_29.pbtxt を配置して
$ cd opencv/samples/dnn
$ python object_detection.py --model frozen_inference_graph.pb --config ssd_mobilenet_v2_coco_2018_03_29.pbtxt --input sample.jpg --width 300 --height 300 --classes ../data/dnn/object_detection_classes_coco.txt
と実行します。画像sample.jpg(ここでは、dog.jpg)は自身で用意して、実行するディレクトリに配置して下さい。検出枠の色が異なりますが、下の画像のようなポップアップ表示が出ます。
Webcamからのライブ映像で物体検出を行う場合は、--input オプションを使用せずに、
$ python object_detection.py --model frozen_inference_graph.pb --config ssd_mobilenet_v2_coco_2018_03_29.pbtxt --width 300 --height 300 --classes ../data/dnn/object_detection_classes_coco.txt
と入力します。
OpenCV DNN を用いた物体検出:Darknet編 |
次に、Darknetモデルを用いた物体検出の例を見てみましょう。tutorial_dnn_yolo.htmlのページを参考にします。YOLO DNNsの使用方法についての記述があります。Darknet関連の学習済みモデルのcfgとweightsファイルは、pjreddie.com/darknet/yolo/からダウンロードできます。
$ wget https://github.com/pjreddie/darknet/blob/master/cfg/yolov3.cfg
$ wget https://pjreddie.com/media/files/yolov3.weights
学習済みモデルのyolo3.weightsとyolo3.cfg ファイルを配置して、
$ python object_detection.py --config yolo3.cfg --model yolo3.weights --classes data/dnn/object_detection_classes_pascal_voc.txt --width 416 --height 416 --scale 0.00392 --rgb
というコマンドを実行すると、パスの指定が間違っているというエラーが出ます。「File yolo3.weights not found! Please specify a path to /opencv_extra/testdata in OPENCV_DNN_TEST_DATA_PATH environment variable or pass a full path to model.」
そこで、コマンドを単純化して
$ python object_detection.py yolo [--width=416 --height=416 --scale=0.00392 --rgb]
と入力すると、OpenCVの古いバージョンでは正常に動作します。yolo オプションでdarkent の学習済みモデルを自動的に検索して読み込むようです。webcamからのライブ映像の物体検出がポップアップします。しかし、バージョンがopencv-python 4.5になるとエラーが出ます。
yolov3モデルを用いたOpenCV DNNの利用の方法を公式サイトに掲載されたコードとは別のコードで実行してみます。解説記事:object-detection-using-yolov3-and-opencvを参考にします。使用するコードを
$ git clone https://github.com/nandinib1999/object-detection-yolo-opencv.git
とダウンロードします。このフォルダー内のyolo.pyを実行します。yolo.pyの内容は以下の通りです。
このスクリプトを実行するためには、Yolov3の学習済みモデル、yolov3.weightsとyolov3.cfgファイル、および、分類分けクラスを記述したcoco.namesが必要です。実行用のディレクトリは以下のような構造にして下さい。
.
├── coco.names
├── images
│   ├── bicycle.jpg
│   ├── busy_street.jpg
│   └── dog.jpg
├── videos
│   ├── car_on_road.mp4
│   └── pedestrians.mp4
├── yolo.py
├── yolov3.cfg
└── yolov3.weights
上の例で使用したDarknetの学習済みモデルのyolo3.weightsとyolo3.cfg ファイルをyolo.pyと同じディレクトリ配置して下さい。coco.namesというクラス分けの分類ファイルも用意して下さい。このcoco.namesの中身は、OpenCVの公式Githubからダウンロードしたファイル「/data/dnn/object_detection_classes_coco.txt」と同じです。yolo.pyの#Load yoloでは、"yolov3.weights"と"yolov3.cfg"を読み込む必要があるので、以下のように修正されていることを確認して下さい。
#Load yolo
    def load_yolo():
    net = cv2.dnn.readNet("yolov3.weights", "yolov3.cfg")
    classes = []
    with open("coco.names", "r") as f:
        classes = [line.strip() for line in f.readlines()]

    output_layers = [layer_name for layer_name in net.getUnconnectedOutLayersNames()]
    colors = np.random.uniform(0, 255, size=(len(classes),3))
    return net, classes, colors, output_layers
イメージファイルを用いて物体検出を行うときは、以下のコマンドを実行します。
$ python yolo.py --image=True --image_path="images/busy_street.jpg"
ビデオファイルを用いて物体検出を行うときは、以下のコマンドを実行します。
$ python yolo.py --play_video=True --video_path='videos/pedestrians.mp4'
webcamからのライブ映像で物体検出を行うときは、以下のコマンドを実行します。
$ python yolo.py --webcam=True
以上のコマンドは正常に作動するはずです。
OpenCV DNN を用いた物体検出:Pytorch編 |
最後に、Pytorchの学習済みモデルを変換して利用する方法について説明します。 Conversion of PyTorch Classification Models and Launch with OpenCV Pythonの説明に従います。
PyTorchの学習済みモデル ResNet-50 をONNX形式に変換して、resnet50.onnxを作成します。この変換されたresnet50.onnxモデルを用いてOpenCV DNNでの推論を実行します。このためのPythonスクリプトは opencv/samples/dnn/dnn_model_runnerにあります。以下のコードを入力して下さい。dnn_conversion/pytorch/modelsディレクトリにresnet50.onnxファイルが作成されます。
$ cd Opencv/opencv/samples/dnn
$ python -m dnn_model_runner.dnn_conversion.pytorch.classification.py_to_py_resnet50

結果:
OpenCV DNN prediction:

* shape: (1, 1000)
* class ID: 335, label: fox squirrel, eastern fox squirrel, Sciurus niger
* confidence: 14.8308

PyTorch model prediction:

* shape: torch.Size([1, 1000])
* class ID: 335, label: fox squirrel, eastern fox squirrel, Sciurus niger
* confidence: 14.8308
上記のように、OpenCV DNNの予測とPytorchによる予測の結果が表示されます。画像分類はImageNet class IDによる分類を使用しています。

resnet50で使用された画像
Pytorchの各種学習済みモデルをonnx形式に変換すれば、OpenCVのDNNだけを活用して画像分類が可能になります。onnx形式への変換は以下のコードを使用するか、または、torch.onnx.export() 関数を利用すればモデルを簡単にonnx形式でエクスポートできます。
$ python -m dnn_model_runner.dnn_conversion.pytorch.classification.py_to_py_cls --model_name {pytorch_cls_model_name}
 --test True --default_img_preprocess {True /False} --evaluate False
以下のモデルが使用可能です。
alexnet
vgg11
vgg13
vgg16
vgg19
resnet18
resnet34
resnet50
resnet101
resnet152
squeezenet1_0
squeezenet1_1
resnext50_32x4d
resnext101_32x8d
wide_resnet50_2
wide_resnet101_2
onnx形式のモデルとOpenCV DNNモジュールを使用して画像分類をするときは、opencv/samples/dnn/ディレクトリに保存されているスクリプトclassification.pyを使用できます。
$ cd Opencv/opencv/samples/dnn
$ python classification.py --model resnet50.onnx --input ../data/squirrel_cls.jpg --classes ../data/dnn/classification_classes_ILSVRC2012.txt
webcamからのライブ映像で物体識別を行うときは、--input オプションを削除します。
Yolov5の学習済みモデルをONNX形式に変換して、OpenCV DNNモジュールを利用した物体検出の方法について説明します。LearnOpenCV.com/のサイトに掲載されている手順を参考にしています。Yolov5の学習済みモデルのONNX形式への変換は以下のコードで行います。
# Clone the repository.
!git clone https://github.com/ultralytics/YOLOv5

%cd YOLOv5
# Install dependencies.
!pip install -r requirements.txt
!pip install onnx

# Download .pt model.
!wget https://github.com/ultralytics/YOLOv5/releases/download/v6.1/YOLOv5s.pt

%cd .. # Export to ONNX.
!python export.py --weights models/YOLOv5s.pt --include onnx

# Download the file.
from google.colab import files
files.download('models/YOLOv5s.onnx')
このコードはGoogle Colabで実行する様式になっていますが、若干修正すれば自身のPCでも実行できます。学習済みモデルは、YOLO5n.ptからYOLO5x6.ptまで多数ありますが、ここでは、その中のyolov5s.ptを変換しています。/models/ディレクトリを作成して、そこにyolov5s.onnxファイルを配置して下さい。他の変換したonnxファイルも、modelsディレクトリに配置して下さい。
物体検出のpythonスクリプト yolov5_detect.py を以下をコピペして作成して下さい。
実行ディレクトリの構造は以下の通りになる必要があります。
.
├── coco.names
├── images
│   ├── bus.jpg
│   ├── dog.ipg
│   └── street.jpg
├── models
│   ├── yolov5l.onnx
│   ├── yolov5m.onnx
│   ├── yolov5n.onnx
│   └── yolov5s.onnx
├── onnx_convert.ipynb
├── yolov5_detect.py
└── yolov5_webcam.py
使用する画像は任意ですが、ここでは、yolov5で使用されている「bus.jpg」です。 以上が準備できたら、
$ python yolov5_detect.py
と実行して下さい。opencv-pythonのバージョンが古いと、NMSBoxesの使用でエラーが出ます。そのときは、OpenCVのバージョンをアップグレードして、 opencv-python==4.5.5.62 をインストールすると解決します。
$ python -m pip install opencv-python==4.5.5.62
と打って、アップグレードして下さい。
Webcamのライブ映像の物体検出をするためには、このスクリプトを修正する必要があります。以下のスクリプトに沿って、「if __name__ == '__main__':」 以下を修正します。
if __name__ == '__main__':
    # Load class names.
    classesFile = "coco.names"
    classes = None
    with open(classesFile, 'rt') as f:
       classes = f.read().rstrip('\n').split('\n')

    # Give the weight files to the model and load the network using them.
    modelWeights = "models/yolov5s.onnx"
    net = cv2.dnn.readNet(modelWeights)

    cap = cv2.VideoCapture(1)
    while True:
        hasFrame, frame = cap.read()

        # Process image.
        detections = pre_process(frame, net)
        img = post_process(frame.copy(), detections)

        # Put efficiency information. The function getPerfProfile returns the overall time for inference(t) and the timings for each of the layers(in layersTimes)
        t, _ = net.getPerfProfile()
        label = 'Inference time: %.2f ms' % (t * 1000.0 / cv2.getTickFrequency())
        print(label)
        cv2.putText(img, label, (20, 40), FONT_FACE, FONT_SCALE, RED, THICKNESS, cv2.LINE_AA)

        cv2.imshow('Output', img)
        key = cv2.waitKey(10)
        if key == 27:  # {CTRL+C}キーで終了
            break

    cap.release()
    cv2.destroyAllWindows()
この修正したpythonスクリプトを yolov5_wecam.py というファイル名で保存します。そして以下のコマンドを入力します。
$ python yolov5_webcam.py
PC内蔵カメラまたはwebcamからのライブ映像の物体検出がポップアップします。
Pytorchの学習済みモデルをONNX形式に変換して、OpenCV DNNを用いた物体検出はPytorchの上でyolov5モデルを実行するケースと比較すると、検出精度が落ちるようです。
以上のコマンドは正常に作動するはずです。
OpenCV DNN を用いたSegmentation |
セマンティックセグメンテーション(Semantic Segmentation)をOpenCV DNN モジュールを用いて実行する例を取り上げます。セマンティックセグメンテーションとは、画像中に含まれる複数の物体に対して物体の領域と物体名をピクセルレベルで確定する作業のことです。
セマンティックセグメンテーションで用いられるアルゴリズムには、主要なものとして、FCN(Fully Convolutional Networks)、 PSPNet、 SegNet、 DeepLab などがあります。TensorflowやPytorchには、これらのSemantic Segmentationに対応するAPIライブラリがあります。OpenCV で利用できるモデルは、Mask R-CNNと呼ばれるアルゴリズのPythonコードです。Mask R-CNNで行うSegmentationはSemantic Segmentationではなく、より難しいInstance Segmentationと呼ばれる手法を採用しています。
OpenCV DNNを用いたsegmentationを実行することに関係するコードの説明は、pytorch_segm_tutorial_dnn_conversion.html、および、tf_segm_tutorial_dnn_conversion.htmlにあります。しかし、この説明の中に登場するsegmentationというフォルダーがGithubのファイルの中には存在しません。また、説明の通りに実行するとエラーが出ます。
ここでは、OpenCV DNNのGithubの中にあるPython スクリプト(mask_rcnn.py)を使用する説明をします。
OpenCVのGithubからのダウンロード以外に必要なファイルは学習済みモデルのファイルです。OpenCV DNNモジュールのプログラム(mask_rcnn.py)は TensorFlowで学習したモデルを前提にしています。Tensorflowのthe frozen graph file(frozen_inference_graph.pb)をダウンロードします。
$ wget http://download.tensorflow.org/models/object_detection/mask_rcnn_inception_v2_coco_2018_01_28.tar.gz
$ tar zxvf mask_rcnn_inception_v2_coco_2018_01_28.tar.gz
対応するconfigファイル「mask_rcnn_inception_v2_coco_2018_01_28.pbtxt」は https://github.com/sambhav37/Mask-R-CNNからダウンロードできます。これらの学習済みモデルの2種類のファイルを/models/に配置します。そして、以下のコマンドを実行します。
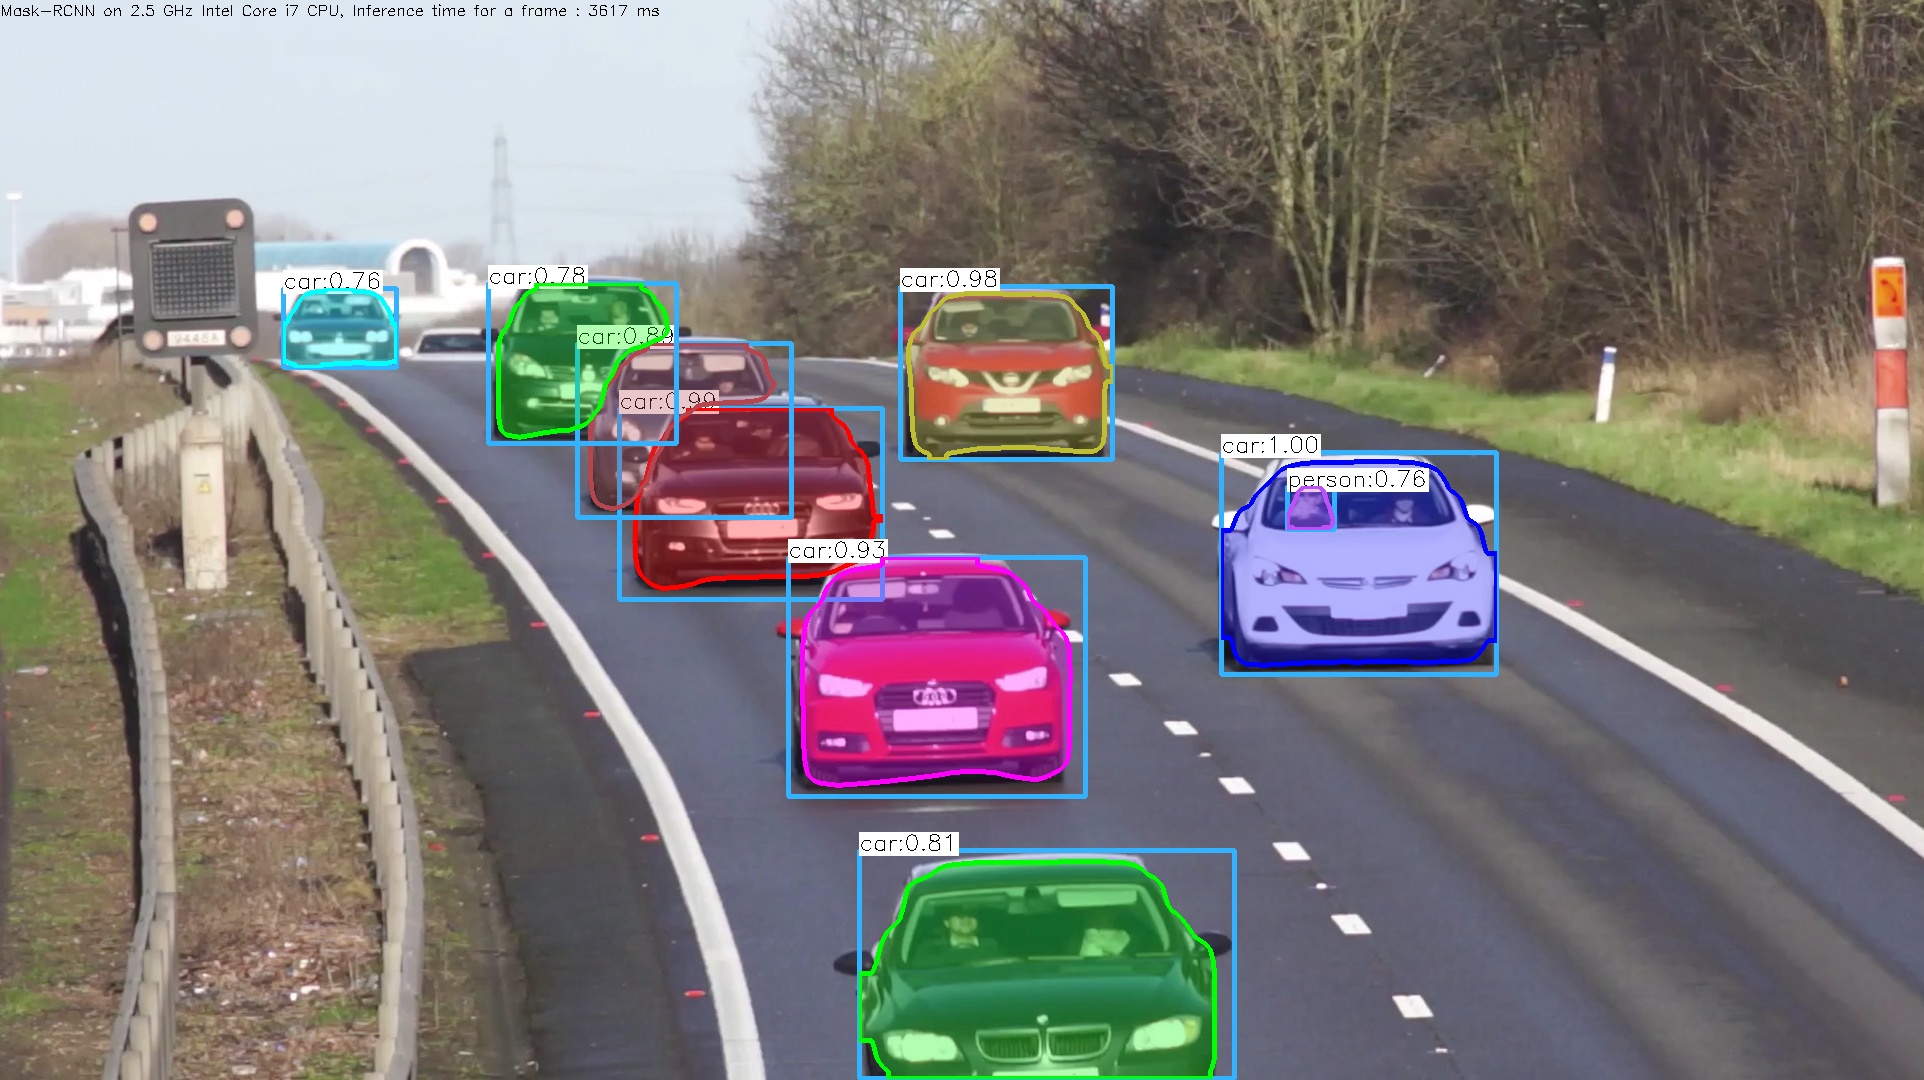
$ cd opencv/samples/dnn
$ python mask_rcnn.py --model=models/frozen_inference_graph.pb --config=models/mask_rcnn_inception_v2_coco_2018_01_28.pbtxt --classes=../data/dnn/object_detection_classes_coco.txt --input=street.jpg
このコマンドで正常に作動するはずです。ここでは、上の例で使用した画像「street.jpg」を使用しました。
webcamからのライブ映像のsegmentationを実行するときは、input オプションを削除します。
$ python mask_rcnn.py --model=models/frozen_inference_graph.pb --config=models/mask_rcnn_inception_v2_coco_2018_01_28.pbtxt --classes=../data/dnn/object_detection_classes_coco.txt
webcamからのライブ映像のsegmentationでは、検出に相当のタイムラグが見られます。やはり、GPUが必要と思われます。
OpenCVを用いたより簡潔なPython コードはLearn OpenCVのサイトで提供されています。Learn OpenCVのサイトで説明されているコードは、このGithubからダウンロードできます。このコードを利用してもセグメンテーションが実行できます。こちらの方が楽勝かもしれません。
$ git clone https://github.com/spmallick/learnopencv/tree/master/Mask-RCNN
$ cd Mask-RCNN
$ wget http://download.tensorflow.org/models/object_detection/mask_rcnn_inception_v2_coco_2018_01_28.tar.gz
$ tar zxvf mask_rcnn_inception_v2_coco_2018_01_28.tar.gz
$ rm mask_rcnn_inception_v2_coco_2018_01_28.tar.gz
とダウロードして、Tensorflowのthe frozen graph file(frozen_inference_graph.pb)を配置します。以下のコマンドを打って、実行します。
$ python3 mask_rcnn.py --image=cars.jpg
セグメンテーション画像が表示されて直ぐに消えますが、「cars_mask_rcnn_out_py.jpg」として保存されます。検出スピードはかなり速いです。
webcamからのライブ映像のセグメンテーションを実行するときは、
$ python3 mask_rcnn.py
とします。webcamのライブ映像のセグメンテーション画像が表示されます。「mask_rcnn_out_py.avi」として保存されます。
4.2バージョン以降のDNN モジュールの追加クラスの利用 |
OpenCV4.1.2以降では、ディープニューラルネットワークモジュール用に3つのクラスを追加提供しています。 これにより、入力画像の前処理と後処理が自動的に実現され、検出結果が直接出力されます。その結果、スクリプトが単純化されます。画像分類、オブジェクト検出、および画像セグメンテーションをサポートします。 以下のモジュールが利用可能です。
これらの説明は、cv::dnn Namespace Referenceの中の対応するモジュールを参照ください。この説明の中では、Pythonの時
cv.dnn.DetectionModel.detect( frame[, confThreshold[, nmsThreshold]] ) -> classIds, confidences, boxes
という様式で、cv2.dnn.DetectionModelがモジュール名になっていますが、cv2.dnn_DetectionModelを使用しないとエラーとなります。最初に簡単な例Object Detection Using OpenCV を参考にして説明します。TensorFlow-Object-Detection-APIからMobileNet-SSD v3のconfigファイルと重みファイルをダウンロードします。
分類のクラス分け用のファイルは、Coco 分類を使用します。coco.namesという名称のtxtファイルにします。object_detection_classes_coco.txtをそのまま使用してもOKです。以下のスクリプトを作成して、detect.pyとします。スクリプトの内容が単純化されています。
import cv2

#importing and using necessary files
config_file='models/ssd_mobilenet_v3_large_coco_2020_01_14.pbtxt'
frozen_model='models/frozen_inference_graph.pb'

#Loading Tenserflow pretrained model by using dnn_DetctionModel module
model = cv2.dnn_DetectionModel(frozen_model,config_file)

#Reading Coco dataset
classLabels=[]
filename='models/yolo3.txt'
with open(filename,'rt') as fpt:
classLabels = fpt.read().rstrip('\n').split('\n')

#input image preproccessing
model.setInputSize(320,320)
model.setInputScale(1.0/127.5)
model.setInputMean((127.5,127.5,127.5))
model.setInputSwapRB(True)

#reading image
img = cv2.imread('models/street.jpg')

#object detection by using dnn_DetectionModel.detect module
ClassIndex, confidence, bbox = model.detect(img, confThreshold=0.5)

#plotting boxes
font_scale = 3
font = cv2.FONT_HERSHEY_PLAIN
for ClassInd, conf, boxes in zip(ClassIndex.flatten(), confidence.flatten(), bbox):
    cv2.rectangle(img, boxes, (0, 255, 0), 3)
    cv2.putText(img, classLabels[ClassInd-1], (boxes[0]+10, boxes[1]+40), font, fontScale=font_scale, color=(0, 0, 255),
thickness=3)

cv2.imshow("object detection", img)
cv2.waitKey()
cv2.destroyAllWindows()
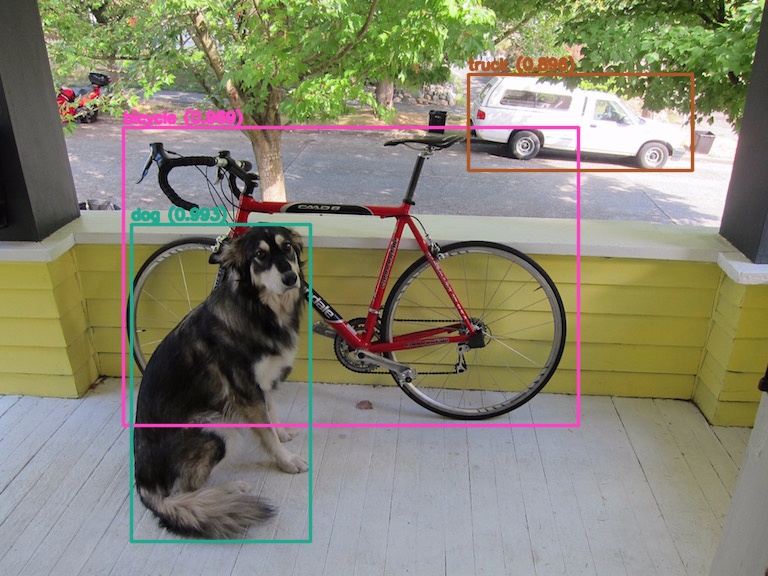
学習済みモデル、分類ファイル、および画像データ「street.jpg」は/models/ディレクトリ配置して下さい。その後、
$ python detect.py
と実行します。

ssd_mobilenet_v3を用いた検出画像
ssd_mobilenet_v2に比較して、処理スピードは同じくか、早いくらいです。ssd_mobilenet_v2のfrozen_inference_graph.pbのサイズは約70MBで、ssd_mobilenet_v3のそれは約14MBです。
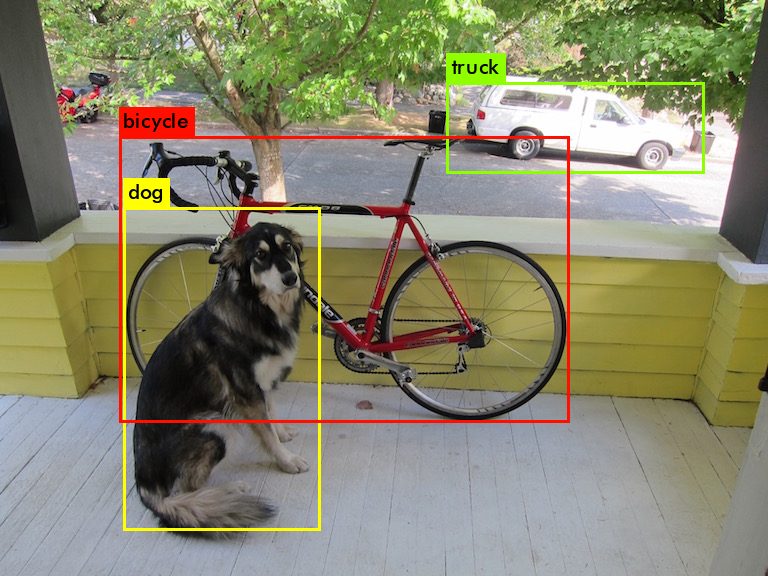
次に、Darknetモデルを使用した例を取り上げます。Yolov4の学習済みモデルを AlexeyAB/darknetからダウンロードします。ここでは、yolov4-mish.weights/yolov4-mish.cfgを採用します。以下のスクリプトを作成して、yolov4.pyとします
import numpy as np
import cv2 as cv

# ファイルからクラスの名前のリストを読み込む関数
def read_classes(file):
    classes = None
    with open(file, mode='r', encoding="utf-8") as f:
        classes = f.read().splitlines()
    return classes

# クラスの数だけカラーテーブルを生成する関数
def get_colors(num):
    colors = []
    np.random.seed(0)
    for i in range(num):
        color = np.random.randint(0, 256, [3]).astype(np.uint8)
        colors.append(color.tolist())
    return colors

def main():
    # キャプチャを開く
    capture = cv.VideoCapture('dog.jpg')
    #capture = cv.VideoCapture(0) # カメラ
    if not capture.isOpened():
        exit()

    # モデルを読み込む
    weights = "yolov4-mish.weights" # 640x640
    config = "yolov4-mish.cfg"
    model = cv.dnn_DetectionModel(weights, config)

    # モデルの推論に使用するエンジンとデバイスを設定する
    model.setPreferableBackend(cv.dnn.DNN_BACKEND_OPENCV)
    model.setPreferableTarget(cv.dnn.DNN_TARGET_CPU)

    # モデルの入力パラメーターを設定する
    scale = 1.0 / 255.0    # スケールファクター
    size = (640, 640)      # 入力サイズ(CSP、MISH)
    mean = (0.0, 0.0, 0.0) # 差し引かれる平均値
    swap = True            # チャンネルの順番(True: RGB、False: BGR)
    crop = False           # クロップ
    model.setInputParams(scale, size, mean, swap, crop)

    # NMS(Non-Maximum Suppression)をクラスごとに処理する
    model.setNmsAcrossClasses(False) # (True: 全体、False: クラスごと)

    # クラスリストとカラーテーブルを取得する
    names = "coco.names"
    classes = read_classes(names)
    colors = get_colors(len(classes))

    while True:
        # フレームをキャプチャして画像を読み込む
        result, image = capture.read()
        if result is False:
            cv.waitKey(0)
            break

        # 画像が3チャンネル以外の場合は3チャンネルに変換する
        channels = 1 if len(image.shape) == 2 else image.shape[2]
        if channels == 1:
            image = cv.cvtColor(image, cv.COLOR_GRAY2BGR)
        if channels == 4:
            image = cv.cvtColor(image, cv.COLOR_BGRA2BGR)

        # オブジェクトを検出する
        confidence_threshold = 0.5
        nms_threshold = 0.4
        class_ids, confidences, boxes = model.detect(image, confidence_threshold, nms_threshold)

        # 2次元配列(n, 1)から1次元配列(n, )に変換
        class_ids = np.array(class_ids).flatten()
        confidences = np.array(confidences).flatten()

        # 検出されたオブジェクトを描画する
        for class_id, confidence, box in zip(class_ids, confidences, boxes):
            class_name = classes[class_id]
            color = colors[class_id]
            thickness = 2
            cv.rectangle(image, box, color, thickness, cv.LINE_AA)

            result = "{0} ({1:.3f})".format(class_name, confidence)
            point = (box[0], box[1] - 5)
            font = cv.FONT_HERSHEY_SIMPLEX
            scale = 0.5
            cv.putText(image, result, point, font, scale, color, thickness, cv.LINE_AA)

        # 画像を表示する
        cv.imshow("object detection", image)
        key = cv.waitKey(10)
        if key == ord('q'):
            break
    cv.destroyAllWindows()

if __name__ == '__main__':
    main()
このスクリプトは https://gist.github.com/UnaNancyOwenさんが提供したコードを引用しました。
$ python yolov4.py
と実行します。学習済みモデルのサイズが大きい(約260MB)ので、処理スピードは早くありません。
yolov4を用いた物体検出の画像
Webcam からの画像の物体検出をするときは、「#capture = cv.VideoCapture(0)」の行のコメントを外します。